|
Forums46
Topics538,525
Posts9,738,182
Members87,095
| |
Most Online25,604
Feb 12th, 2024
|
|
|
 A Beginner's Guide To Reloading
#3138632
04/05/12 02:54 AM A Beginner's Guide To Reloading
#3138632
04/05/12 02:54 AM
|
Joined: Jan 2008
Posts: 9,367
scot
 OP
OP
THF Trophy Hunter
|
|
OP
THF Trophy Hunter
Joined: Jan 2008
Posts: 9,367 |
After all the stupid and abundant questions I figured I would at least document my attempt at reloading so... Disclaimer: The following is from an uneducated novice individual who has made one previous tip at reloading before unsuccessfully at that. Step One: Buy Loading Press/Kit and Accessories Will List out specific tools as I get to them. But I ended up buying a Special 3 RCBS single stage kit that came with a few accessories and 505 scale. Step Two: Set-up Loading Bench I already had this old desk/work bench but if I were to build it from scratch I would have made it quite a bit higher. Its difficult to maneuver the press standing. Also, I was surprised just how quickly I seemed to run out of space but for my simple setup it should work out alright. One note of shelving. I was back and forth between 1x6 and 1x8, 1x8 was absolutely perfect. All accessories fit neatly on the shelves with no hang off. Also for width of cubbies, it appears most of the RCBS case accessories are either 4" or 5" wide so I built cubbies to accommodate. 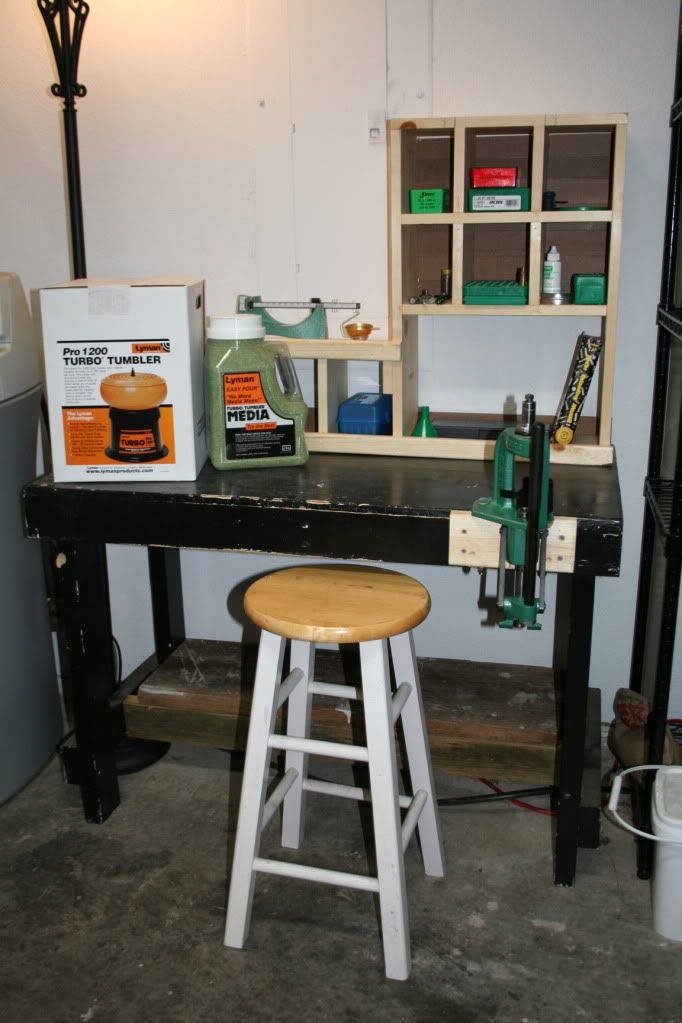 Step 3 Get some brass: Through a number of deals and horse trading I ended up with a bunch of Federal Match ammo and had shot a large amount of it. Luckily I kept the brass so I will be using Federal FC stamped brass for the first round of loads. 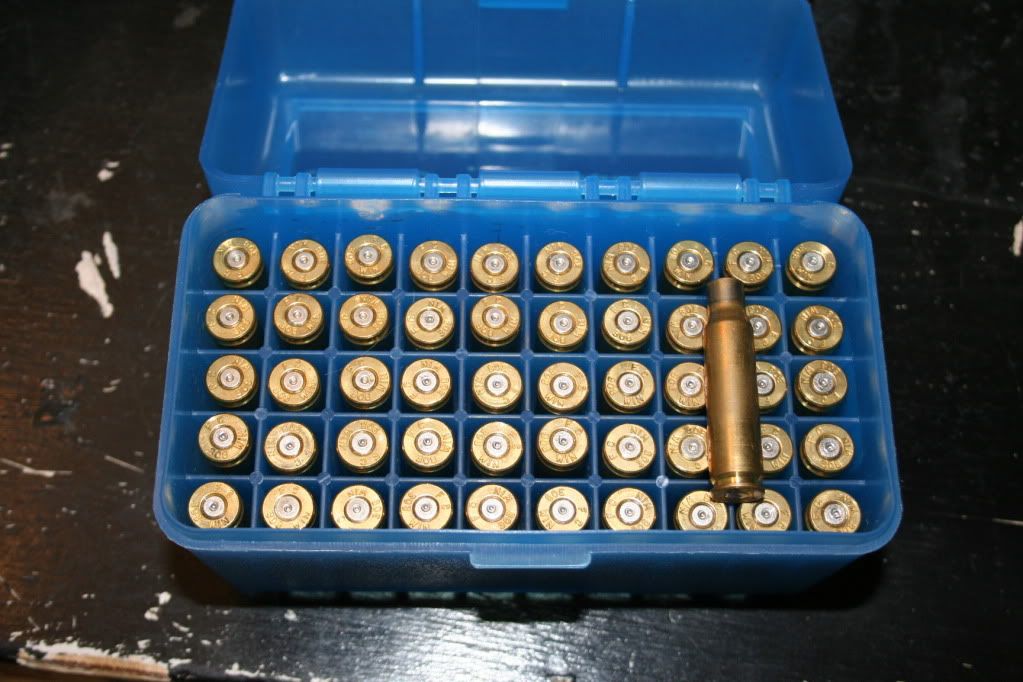 Step 4 De-prime Brass Some will probably totally disagree with this step and maybe I am doing things out of order but I opted to buy an $11 Lee Universal De-prime. It requires no lube and is only built to pop out primers, but this way when I tumble my brass it will at least attempt to clean out primer pockets and hopefully not be too much of a pain to clean out the media. Also, this should save my sizing die from dirt, etc. so I saw it as a worth while investment. It didn't take 5 minutes to de-prime the 51 pieces of brass I am working. 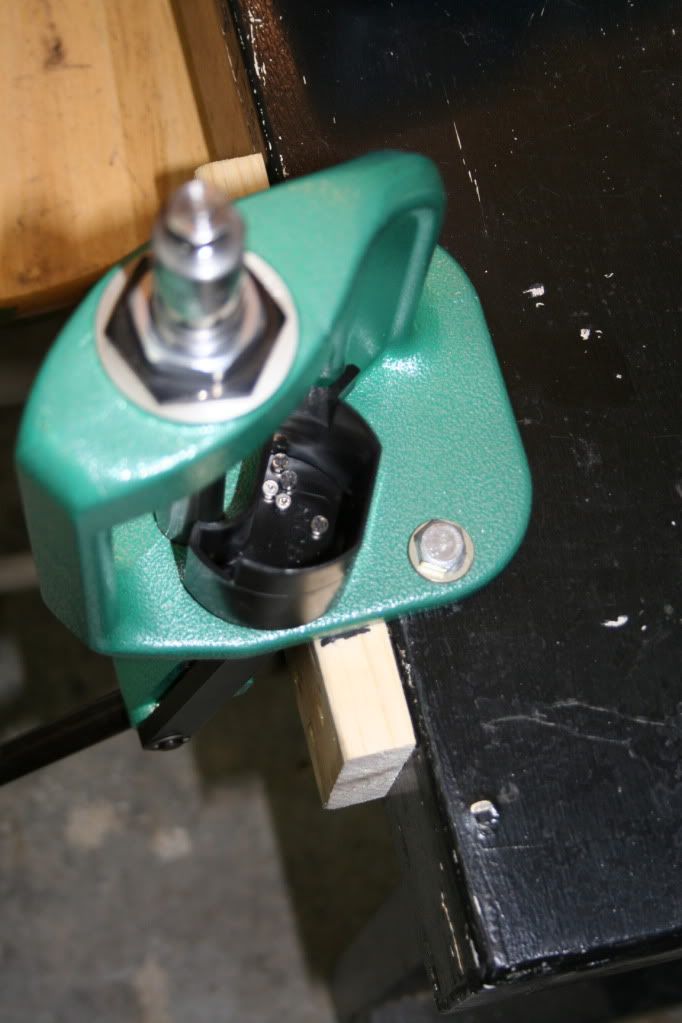 Picture of the Lee Deprimmer 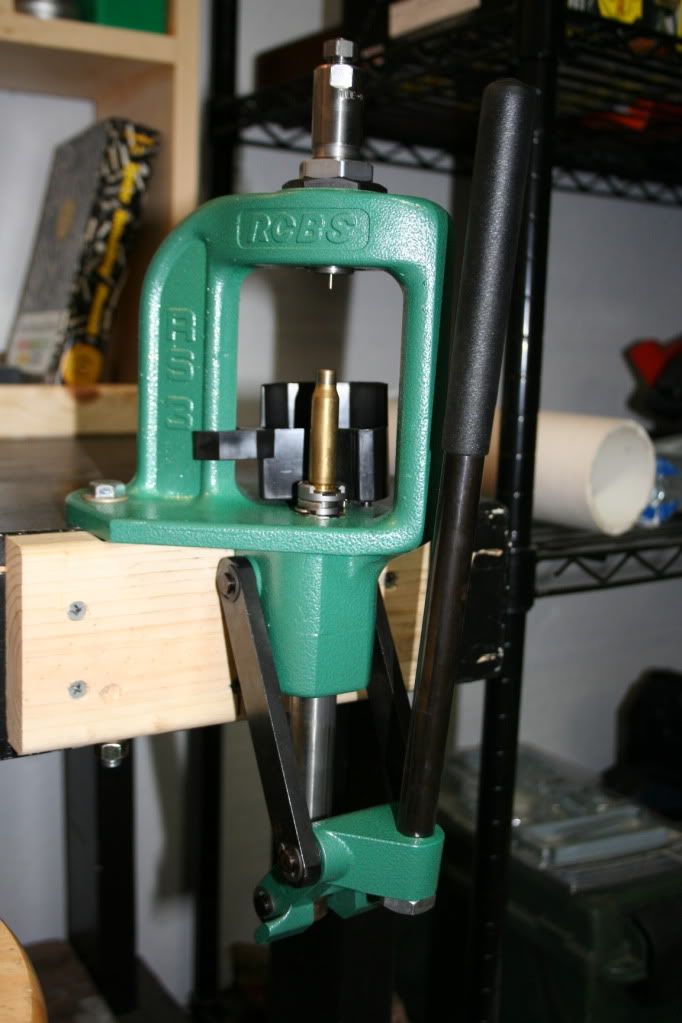 Load brass in shell holder 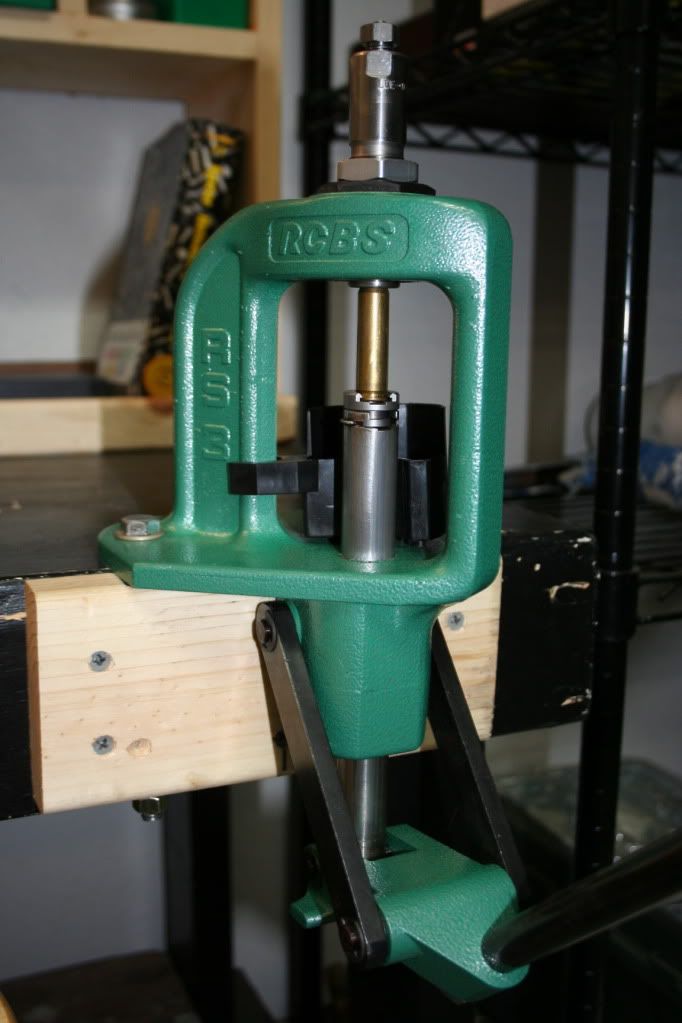 Adjust die so that it primer pops at the top of the stroke. I did have to lower the deprimming rod but if you can't figure that out its probably time to stop reloading. 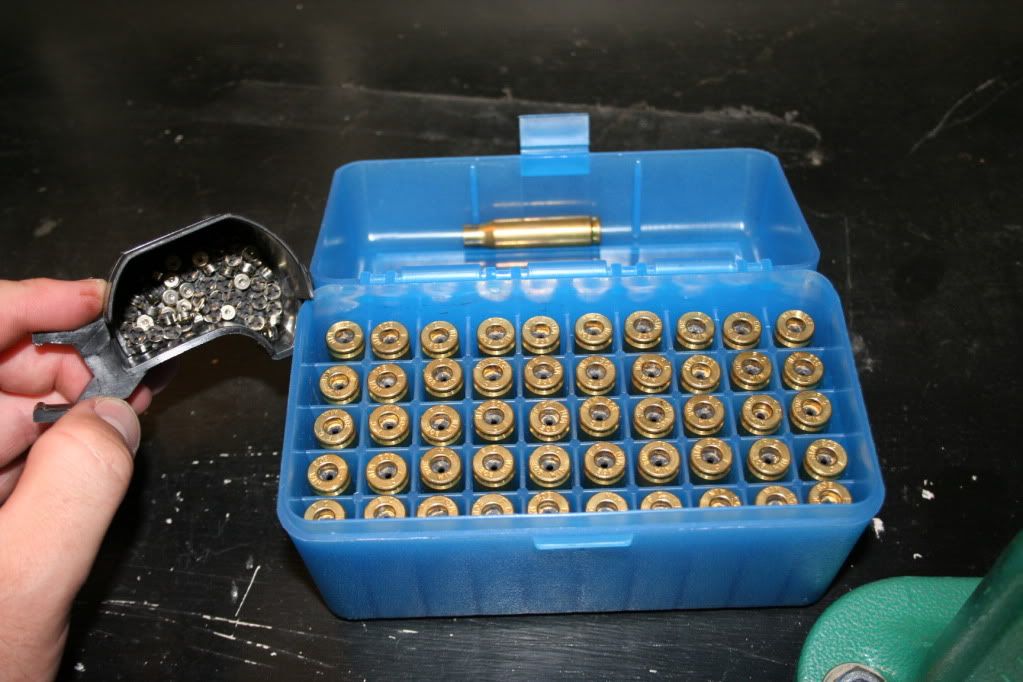 51 deprimmed cases and a bunch of spent primers
|
|
|
|
Re: A Beginner's Guide To Reloading
[Re: scot]
#3138649
04/05/12 03:01 AM
|
Joined: Jan 2008
Posts: 9,367
scot
OP
THF Trophy Hunter
|
|
OP
THF Trophy Hunter
Joined: Jan 2008
Posts: 9,367 |
Step 5 Tumble Brass I was back and forth on the tumbler decision. While many say they get away without using it, I figured if I didn't order it now I would just have to pay big shipping again so I went ahead and ordered it. Read back and forth about the corn vs walnut vs both argument didn't have a definitive answer so since I was starting with decently clean brass I went corn. If it doesn't work I'll stop by a local shop and buy walnut. (Rounds are currently in the tumbler so I can't update how long it is going to take) 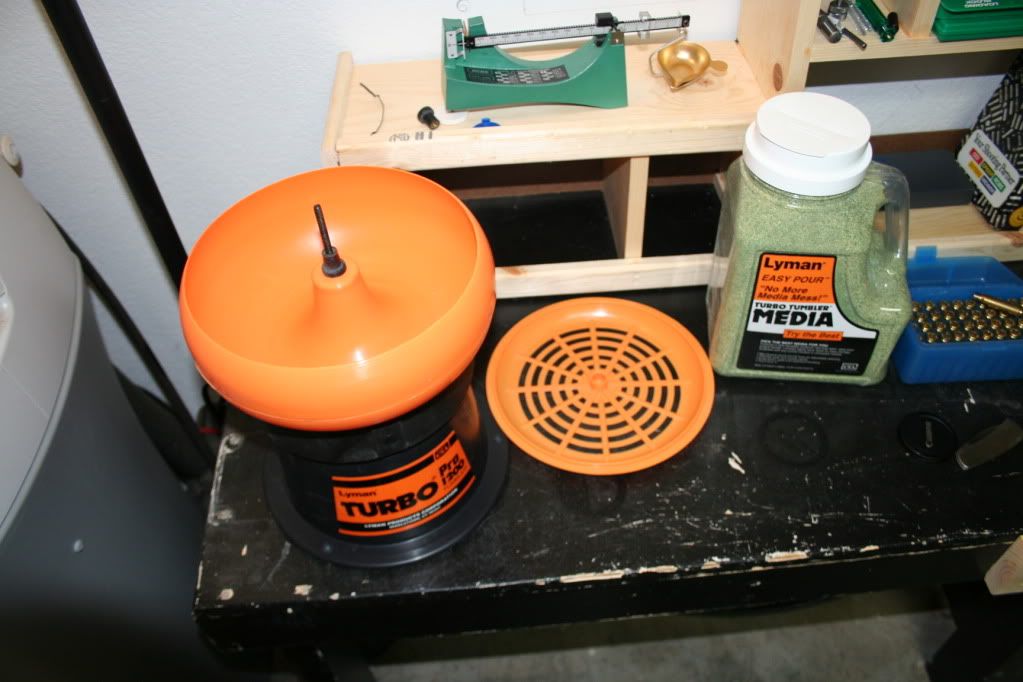 Tumber came fully assembled ready to rock. No on off switch on this one but hey it was $46 so I can manage. 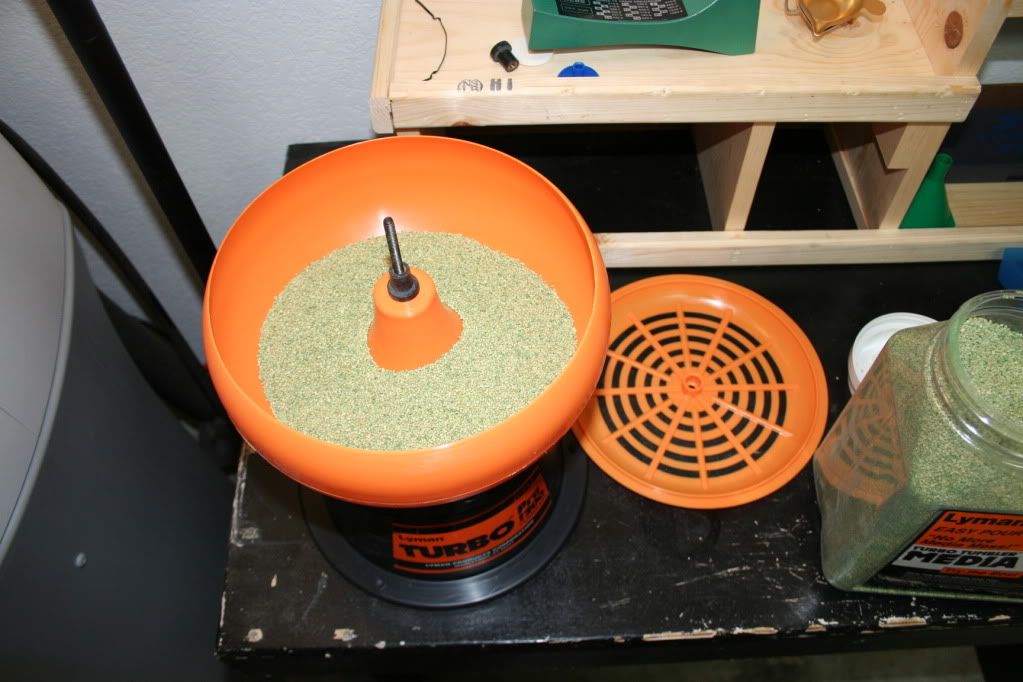 Little media first 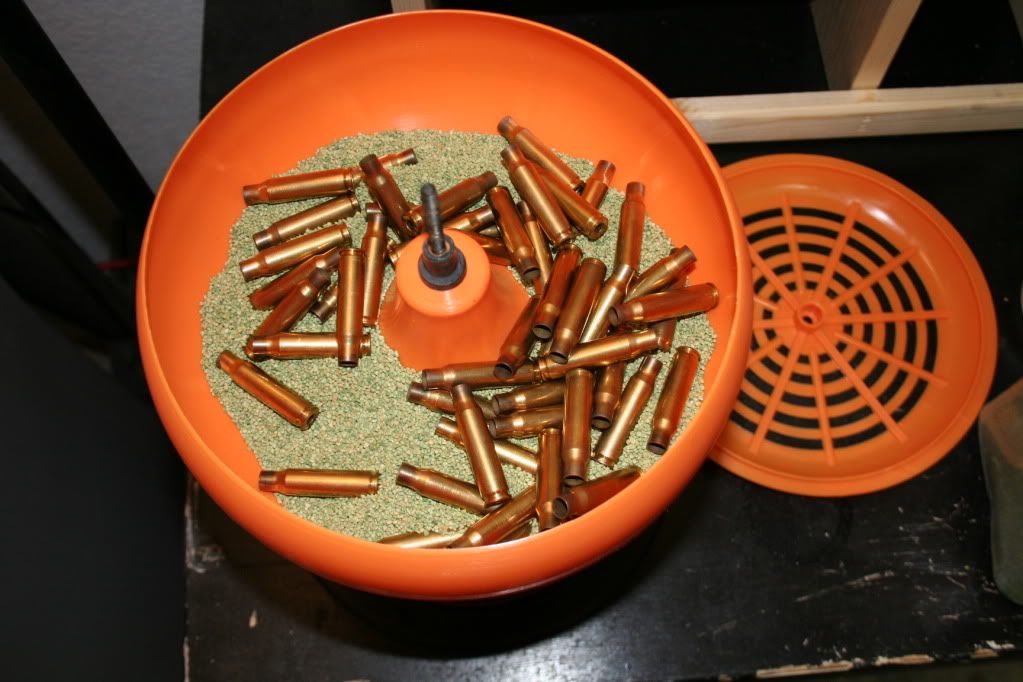 Poor in brass. Then cover with media. 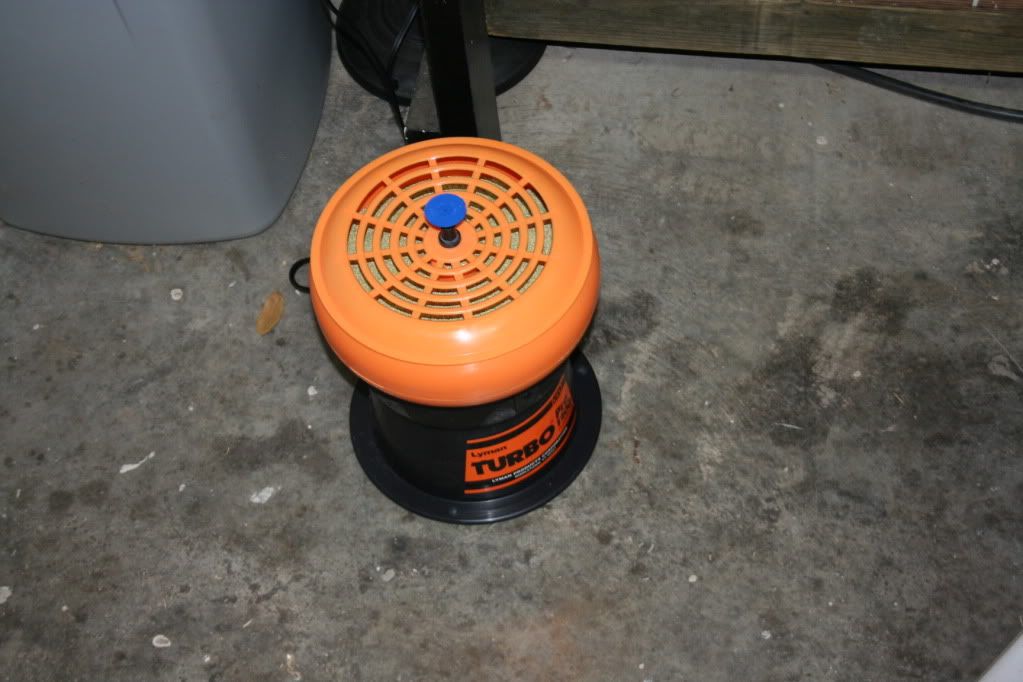 It appeared very stable when on the bench however I didn't want to risk it so I opted to leave it on the floor. Didn't want a broken tumbler and media all over the floor when I check back on it. 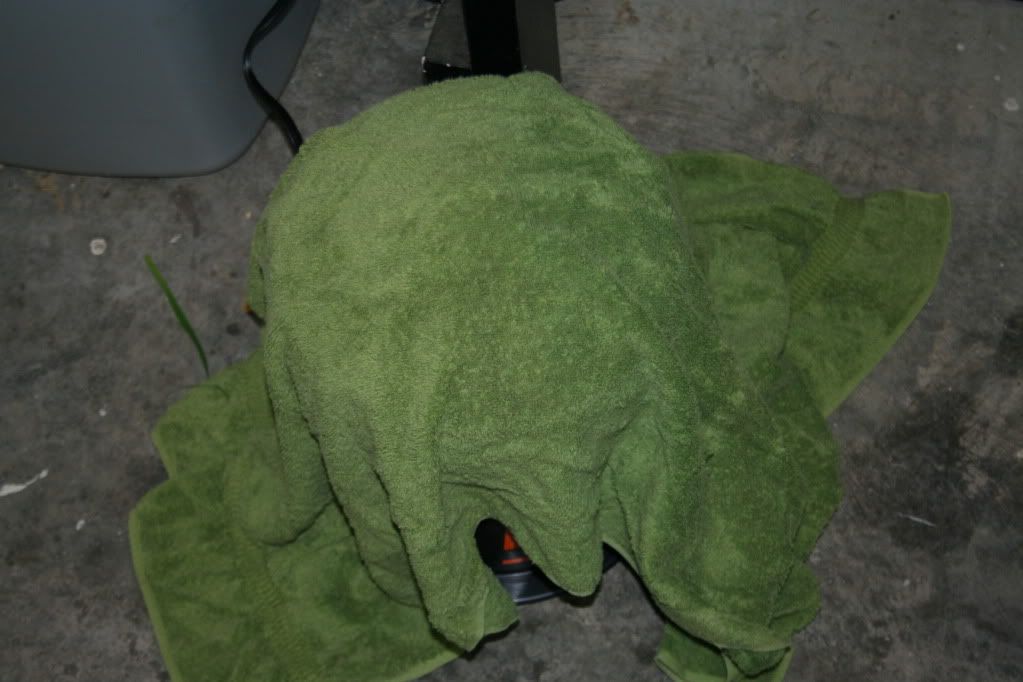 This model has a handy sifter lid. Which is great but throws dust and media out while it tumbles. Simple solution is a towel which cuts down on the noise but I can't here it just inside the house so its not that big of deal. Step 6 Prep Sizing Die I went ahead and went the Full Length route, while it doesn't fit the rifle as perfect I will probably be running these loads in two different rifles so I figure completely resizing wouldn't hurt that bad. 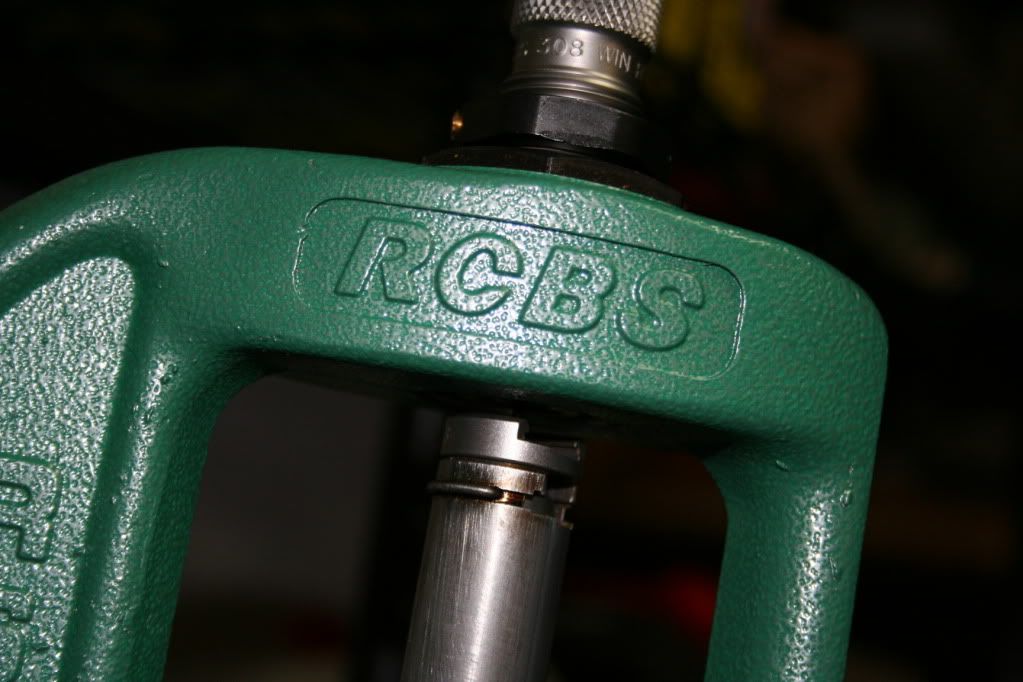 Run Ram to full stroke. 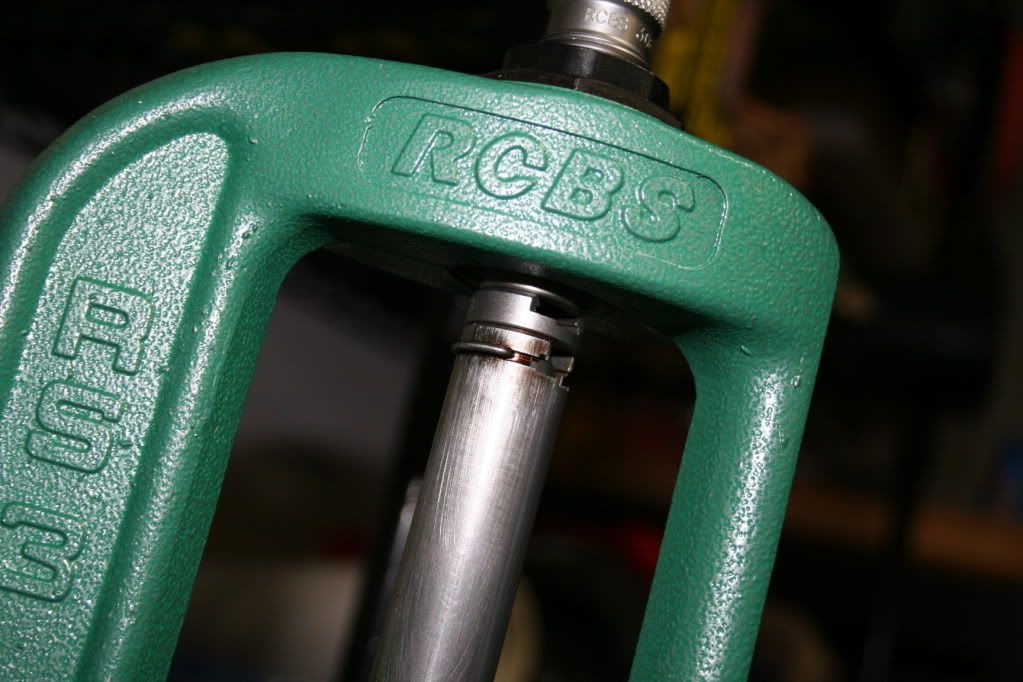 Twist sizing die down onto shell holder. I lowered the ram slightly and twisted the die 1/4 down(clockwise) so it was repeatable but did cam over lightly. 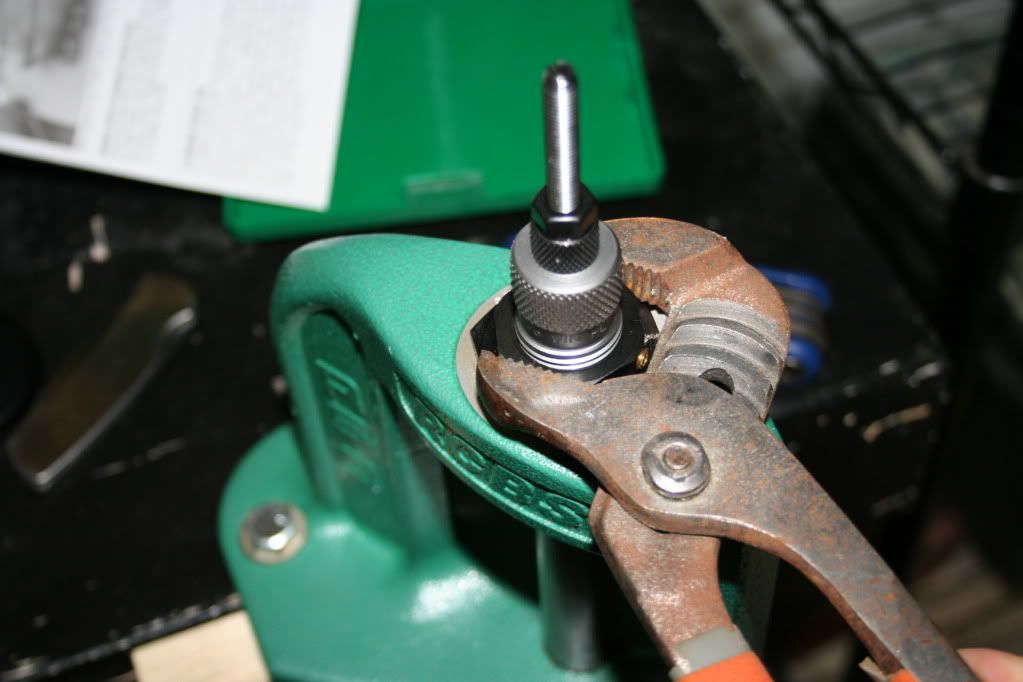 Ever so slightly snug the lock ring, then tighten the brass set screw with an allen wrench. Will test the die placement on my rifle before running all of the brass through but my understanding is this method should ensure no issues with brass size. And that completed day one. Will clean out primer pockets and media tomorrow, then re-size, trim if need and hopefully prime. Updates to follow.
|
|
|
|
Re: A Beginner's Guide To Reloading
[Re: scot]
#3138916
04/05/12 10:39 AM
|
Joined: Nov 2004
Posts: 14,768
jeh7mmmag

gramps
|
|
gramps
Joined: Nov 2004
Posts: 14,768 |
Great job Scot. Graphic are great!
�Everybody needs beauty as well as bread, places to play in and pray in,
where nature may heal and give strength to body and soul.�
~ John Muir
|
|
|
|
Re: A Beginner's Guide To Reloading
[Re: jeh7mmmag]
#3138951
04/05/12 11:28 AM
|
Joined: Aug 2011
Posts: 13,416
jdk1985
THF Celebrity
|
|
THF Celebrity
Joined: Aug 2011
Posts: 13,416 |
yeah, good job. I can see this as helpful for someone interested in but not yet reloading, or someone just starting.
Instagram @justinkingwoodworking
|
|
|
|
Re: A Beginner's Guide To Reloading
[Re: jdk1985]
#3139092
04/05/12 01:06 PM
|
Joined: Sep 2006
Posts: 32,533
kmon11

junior
|
|
junior
Joined: Sep 2006
Posts: 32,533 |
 Good job, lookign forward to your post for completing the process
lf the saying "Liar, Liar your pants on fire" were true
Mainstream news might be fun to watch
|
|
|
|
Re: A Beginner's Guide To Reloading
[Re: kmon11]
#3139215
04/05/12 01:58 PM
|
Joined: Jul 2007
Posts: 23,638
Payne
Cat Herder
|
|
Cat Herder
Joined: Jul 2007
Posts: 23,638 |
Great write up and pictures.
|
|
|
|
Re: A Beginner's Guide To Reloading
[Re: Payne]
#3139247
04/05/12 02:12 PM
|
Joined: Aug 2011
Posts: 1,682
cmorsch
Pro Tracker
|
|
Pro Tracker
Joined: Aug 2011
Posts: 1,682 |
Good job with the guide so far.
|
|
|
|
Re: A Beginner's Guide To Reloading
[Re: cmorsch]
#3139272
04/05/12 02:25 PM
|
Joined: Jan 2007
Posts: 26,256
KRoyal

Texoma Legend
|
|
Texoma Legend
Joined: Jan 2007
Posts: 26,256 |
One of the things I did when I started loading was deprimed and sized at the same time, then threw the brass in the tumbler so it also cleaned off the sizing lube. Once the brass is done you have a deprimed sized clean brass to start loading with.
This was just my experience because I used the spray lube which after a bit got really sticky and it seemed like no matter how good you cleaned it after sizing when you dropped the powder in it would get stuck inside the mouth of the brass and make a mess. thats why I started tumbleing after sizing, it cleans in and out so no more lube for the powder to stick to.
Also I couldn't tell from the pics if that was 223 or 308 brass looked like 308 but if that was military brass you want to make sure you get the primer crimp reemed out good otherwise it will be hell trying to prime the brass.
Have fun.
|
|
|
|
Re: A Beginner's Guide To Reloading
[Re: KRoyal]
#3139520
04/05/12 04:15 PM
|
Joined: Jan 2008
Posts: 9,367
scot
OP
THF Trophy Hunter
|
|
OP
THF Trophy Hunter
Joined: Jan 2008
Posts: 9,367 |
I plan to run the brass through the tumbler again after sizing to clean lube off but shouldn't take nearly as long.
.308 non military. Standard Federal brass so there shouldn't be priming issues. I hope to have everything ready for powder tomorrow but possible before.
|
|
|
|
Re: A Beginner's Guide To Reloading
[Re: scot]
#3139581
04/05/12 04:40 PM
|
Joined: Jan 2007
Posts: 26,256
KRoyal
Texoma Legend
|
|
Texoma Legend
Joined: Jan 2007
Posts: 26,256 |
Gotcha well let us know how it turns out.
|
|
|
|
Re: A Beginner's Guide To Reloading
[Re: KRoyal]
#3139712
04/05/12 05:45 PM
|
Joined: Feb 2009
Posts: 3,705
toolman
Extreme Tracker
|
|
Extreme Tracker
Joined: Feb 2009
Posts: 3,705 |
Looking good so far except for a couple of items. First off, that bench is way too clean and organized!  Second, unless you want boogered up lock rings, lose the pliers and get a wrench that fits correctly. I try to keep all pliers away from my bench because it's just too easy to grab them when you're in a hurry and before long, you've got plier rash on all of your dies.
Old age ain't for sissies!
|
|
|
|
Re: A Beginner's Guide To Reloading
[Re: toolman]
#3139761
04/05/12 06:03 PM
|
Joined: Jan 2008
Posts: 9,367
scot
OP
THF Trophy Hunter
|
|
OP
THF Trophy Hunter
Joined: Jan 2008
Posts: 9,367 |
Only loading for one round so I am very limited on junk so far. I see it getting much worse...
Also, was feeling lazy, left my larger cressant wrench in the barn and wasn't wanting to walk that far just to set the die.
|
|
|
|
Re: A Beginner's Guide To Reloading
[Re: scot]
#3142564
04/06/12 11:23 PM
|
Joined: Jan 2008
Posts: 9,367
scot
OP
THF Trophy Hunter
|
|
OP
THF Trophy Hunter
Joined: Jan 2008
Posts: 9,367 |
Step 6a 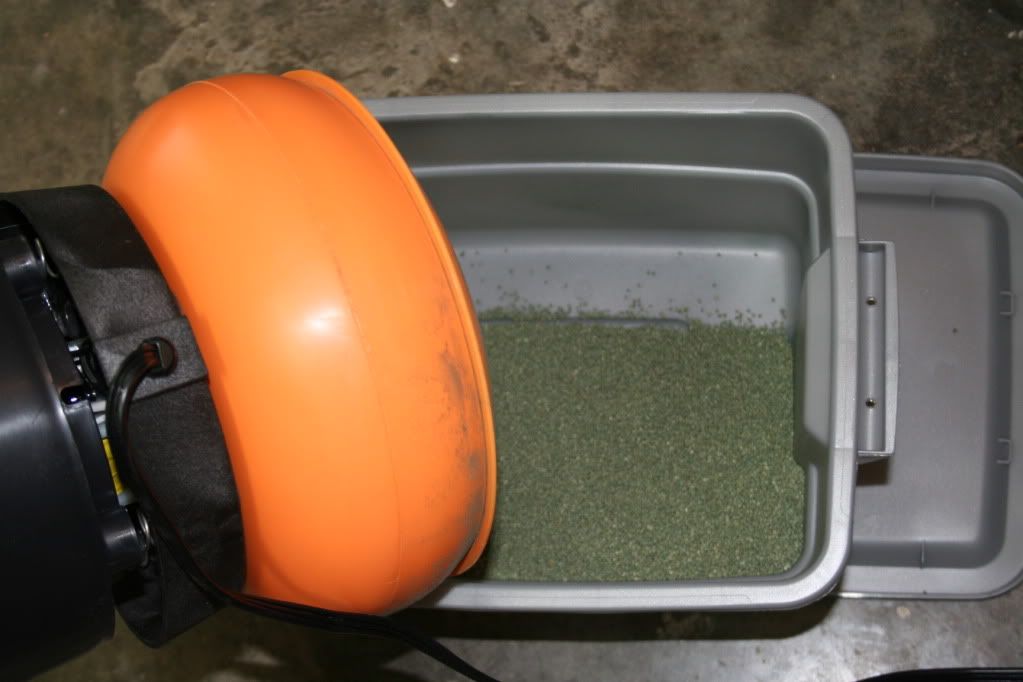 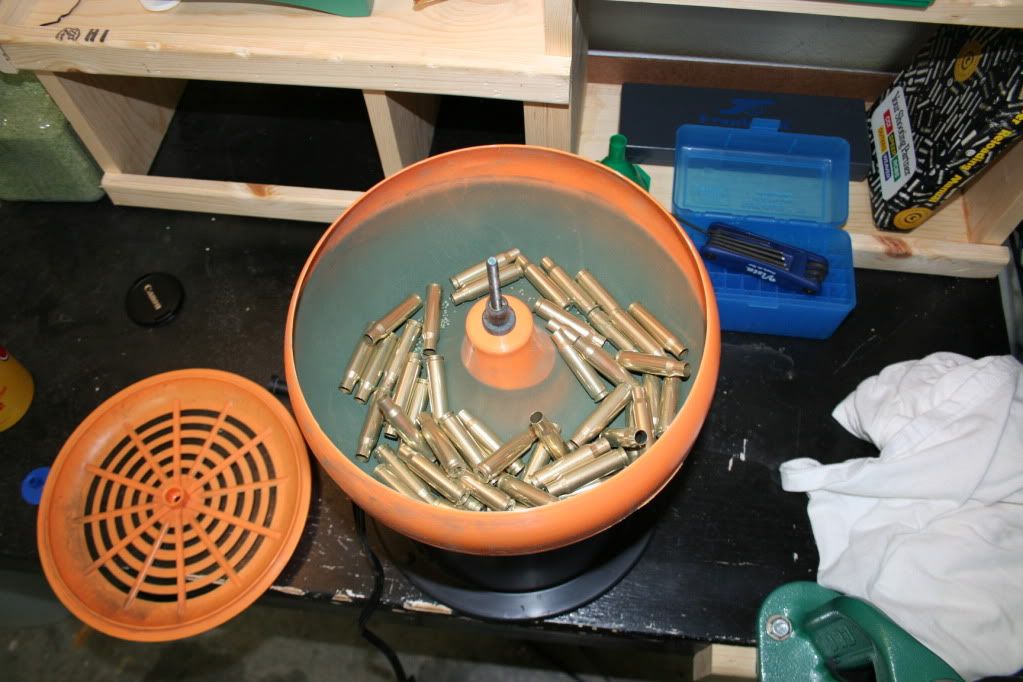 Set timer and have brass run a number of hours while at work. I came home to a tumbler running and sparkly clean brass. the small rubbermaid container was great for using the separating top and I will just store the media there instead of trying to get it back to the container. The first time I reloaded I used a tumbler without separating capabilities and a was quickly able to appreciate that feature. Step 7 Primer Pockets 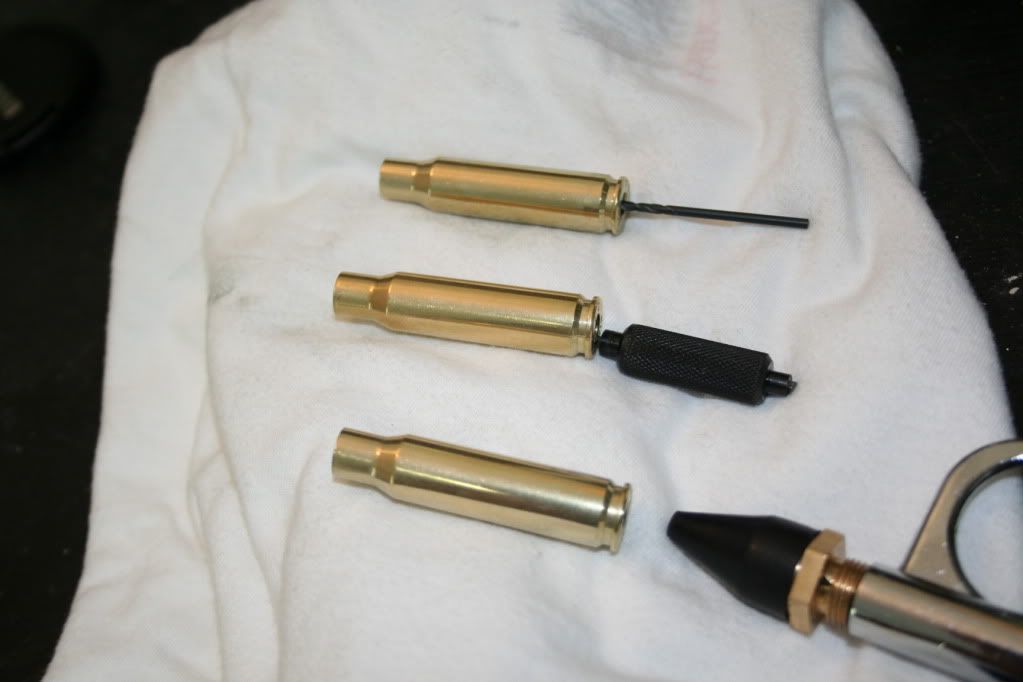 tools for primer pockets 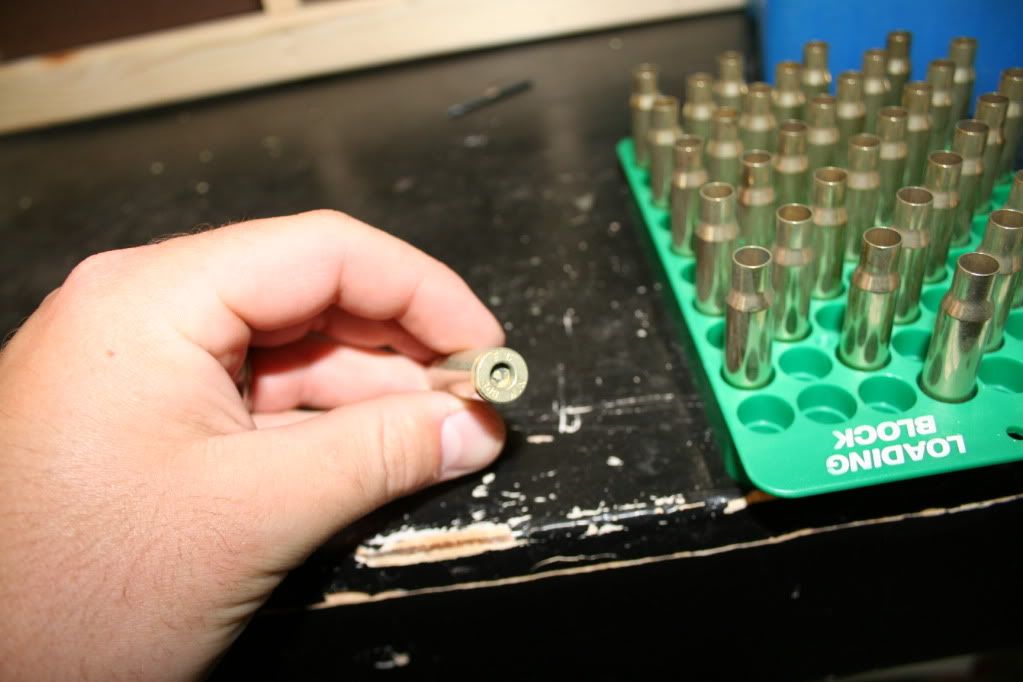 notice the media in the flash hole 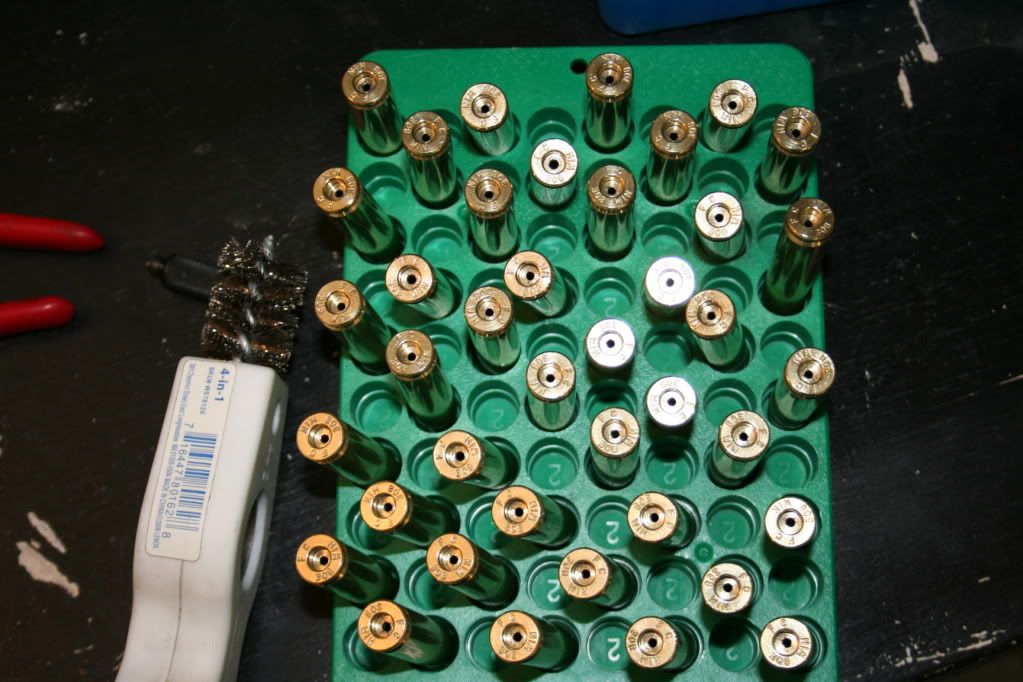 Leave brass primer side up for another visual check to be sure things are going as planned. Since media will be caught in the flash hole its as good a time as any to go ahead and clean out primer pockets. I thought the $3 lee pocket cleaner would suffice but after three rounds it wasn't getting the job done. Ran to two local stores but neither had a primer pocket brush so I opted to use the plumbing pipe cleaner tool. A 5/64ths i believe was the perfect sized drill bit to push the spec of media out of the hole. Also, a compressor with a spray nozzle and rubber tip is great for getting media out of your brass. Finally I used an old undershirt to wipe the brass off before lubing and sizing. Step 8 Lube Cases 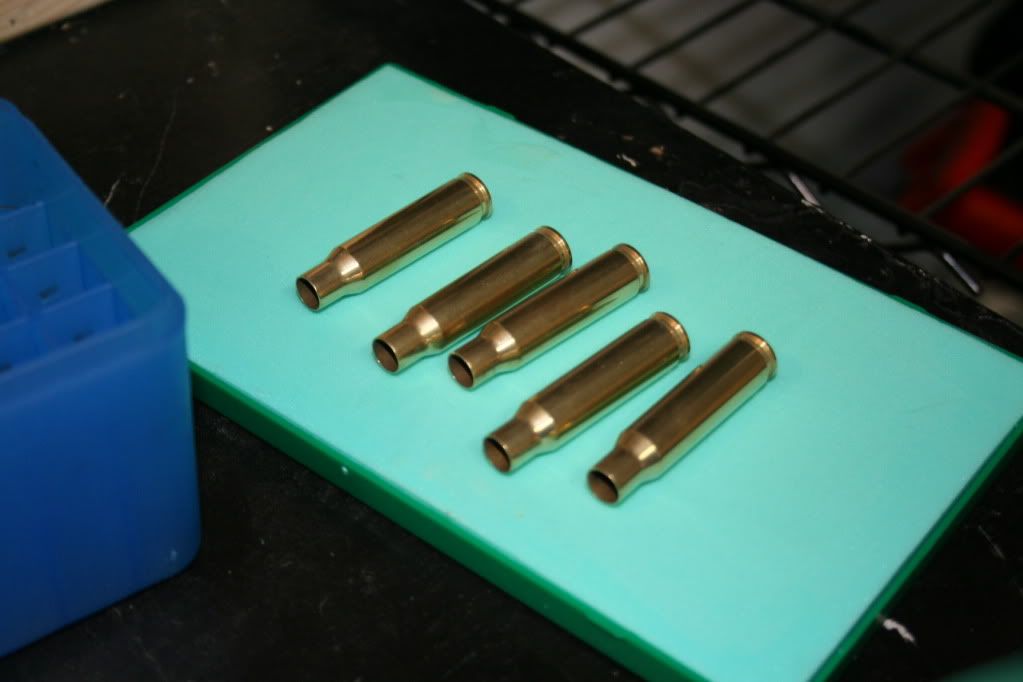 4 to 5 cases at a time work well. 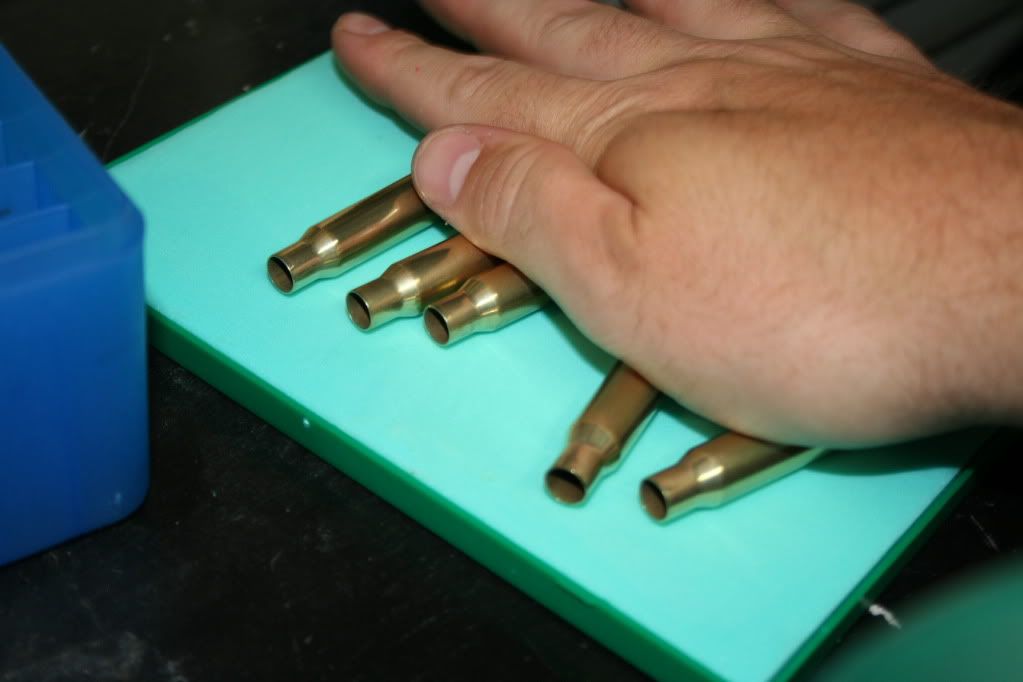 Use your hand but you will get lube on it. 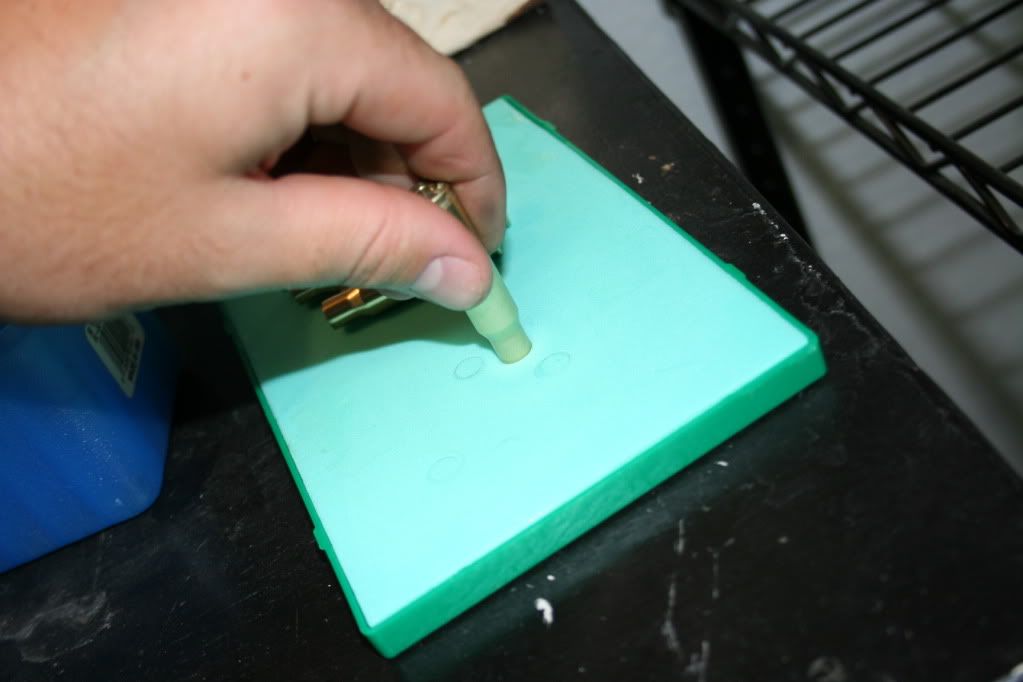 finally before going into the size twist the neck end of the case on the pass so the sizing ball will slide throuhg alright. There are 400 different types of sizing lube available. This bottle from 1987 was slightly discolored but I applied it to the pad and was good to go. Step 9 Size Brass Run brass through your already set-up sizing die. Know that your up stroke will take a bit more effort. (pictures above demonstrate it alright)
|
|
|
|
Re: A Beginner's Guide To Reloading
[Re: scot]
#3142591
04/06/12 11:44 PM
|
Joined: Jan 2008
Posts: 9,367
scot
OP
THF Trophy Hunter
|
|
OP
THF Trophy Hunter
Joined: Jan 2008
Posts: 9,367 |
Step 10 Trim Cases 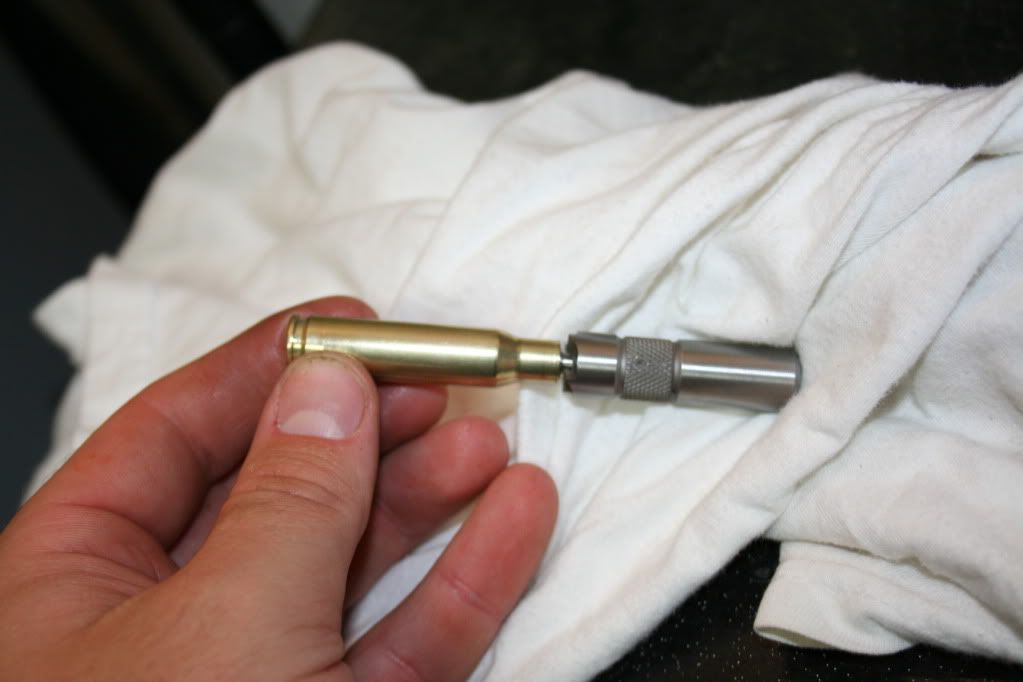 I opted to go with the cheapo lee hand held trimmer. for $8 I felt like it got the job done. However, consistency was bases on the quality of flash holes and it appeared my overall length was between 2.009-2.012 a bit under spec but should run just fine. Many out there negate trimming until brass isn't a problem but I was hoping for the utmost in accuracy so I spent the time to do it. It comes will a drill attachment but I did it by hand. 50 cases was tough but made it through alright. Step 11 Chamfer and Debur Cases nearly every die and press manufacturer has a tool to do both. i went with the Foster because it was cheaper. It doesn't have the pin in the center and I noticed I had more issues with it slipping off than with the RCBS. Also managed to stab myself a few times. I did all of the rounds with that tool but have since bought the Lyman Case Prep kit. This process helps with bullet seating and is pretty necessary. 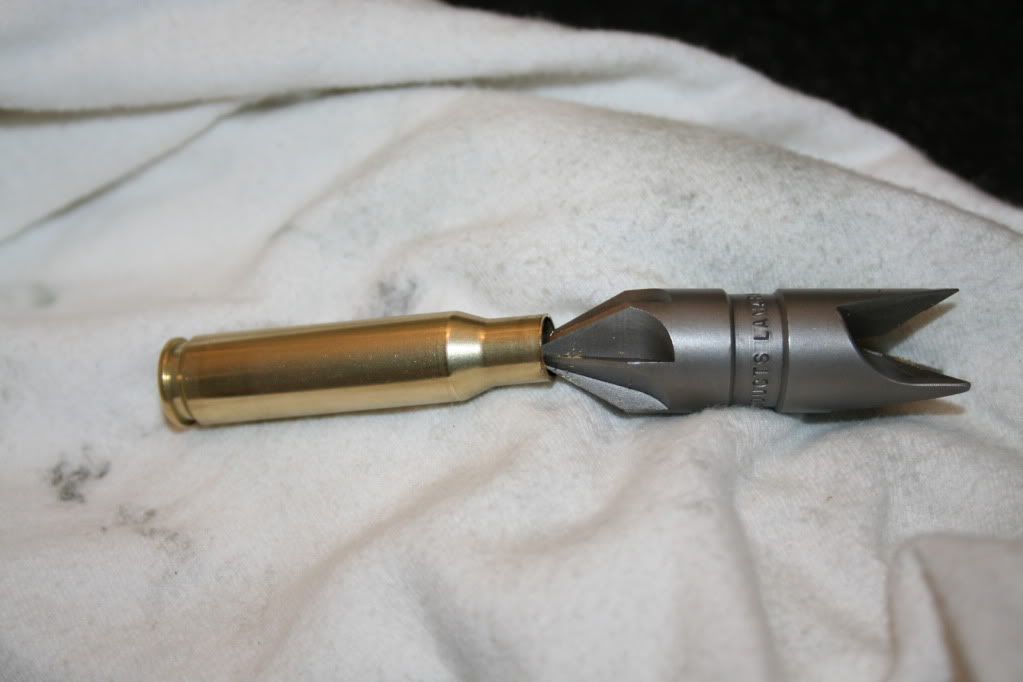 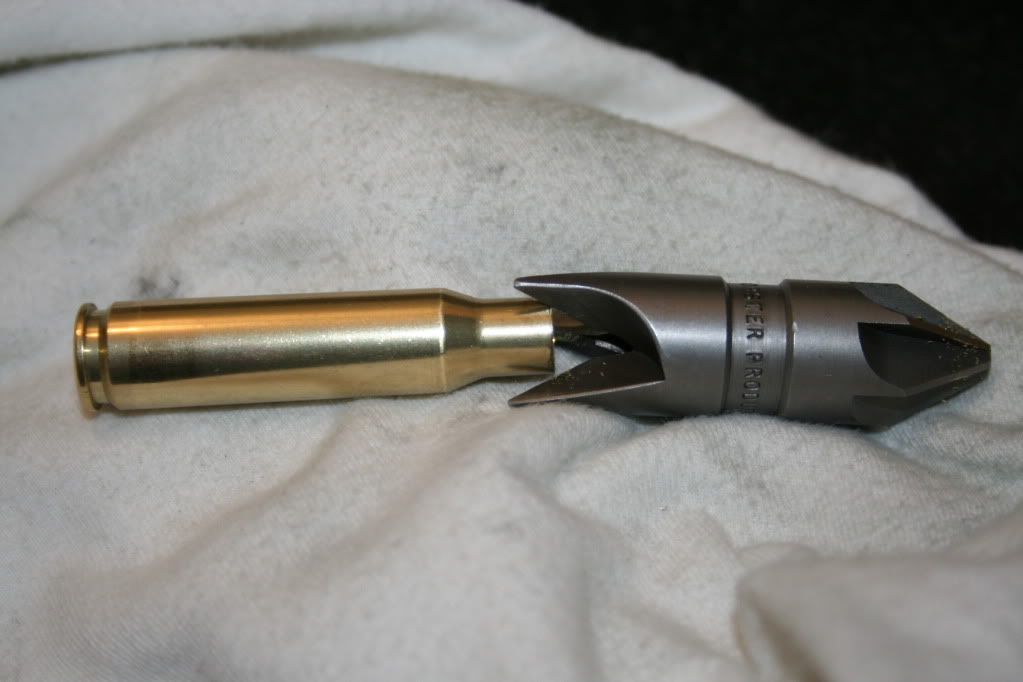 Step 12 Back to the tumbler As mentioned before some size before tumbling I opted not to but at this point the cases need a quick run to get the lube off before priming and powder. 30 minutes or so should suffice and it gives you the perfect opportunity to setup your seating die. keep one piece of prepped brass. Step 13 Set-up Seating Die I mentioned 51 pieces of brass a few times and this is why the extra 1. A wise man suggested to me to make a base line round without powder and primer so if dies ever change etc you will be able to reference it. This extra 1 will be that round. It should not go back into the tumbler it isn't going to get a primer or powder so the extra lube is a non issue and may assist in the seating process. 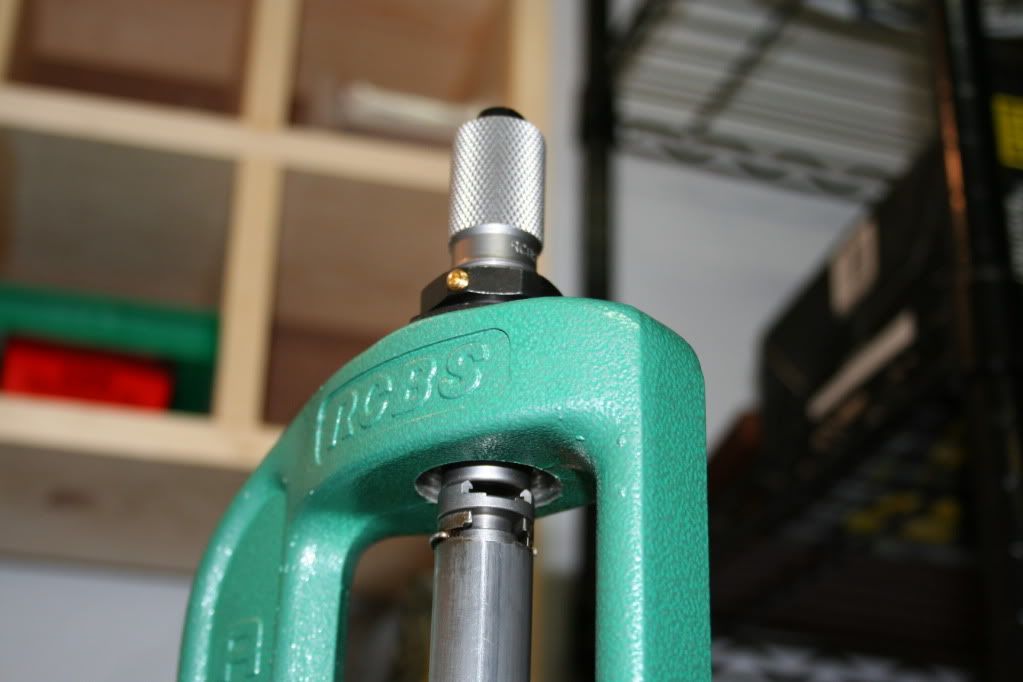 The typical method for the initial setup is to run your press ram to full stroke. Twist the die down until it touches then back it off a full turn. You do not want to be able to extra the brass too far into the die or it will crush your load and ruin your hard work.  ******* BACK OFF THE SEATER A BUNCH FROM THE FACTORY SETTING***** 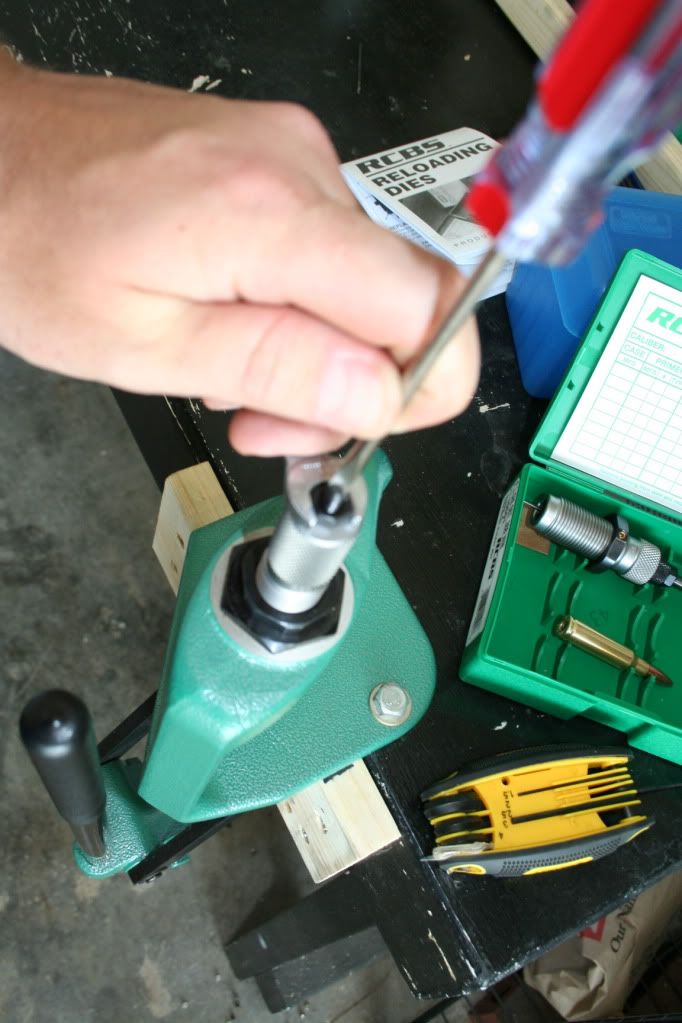 I thought I backed the round off a number or turns and would be just fine. I ran that piece or brass with a bullet and seated it .07" too deep...... So Step 13+ Buy Bullet Puller I was going to just buy an inertia hammer when another wise individual informed me that without powder they don't work. Luckily my local Gibson's had these pullers for half off so I ran hours out to cabelas to buy the appropriate collect and was able to quickly pull the bullet and correctly adjust my die. 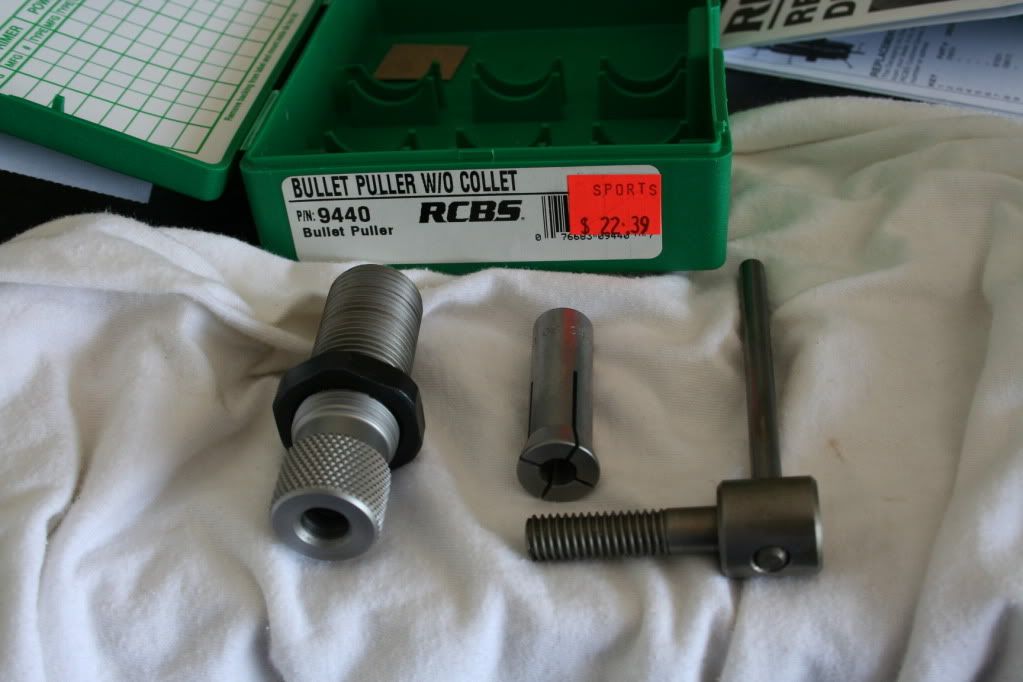 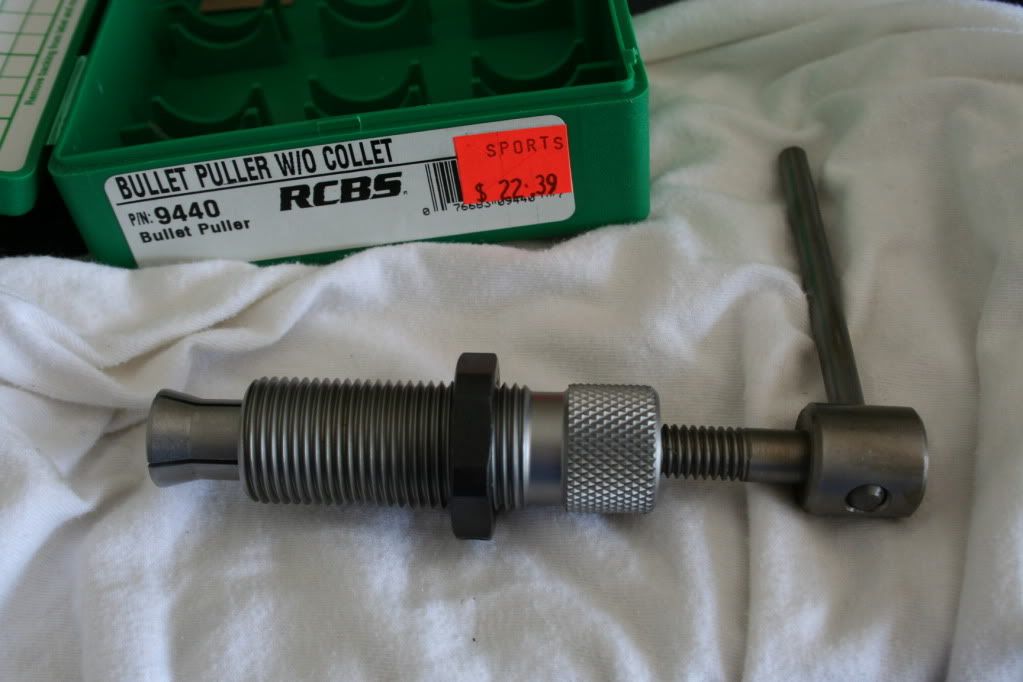 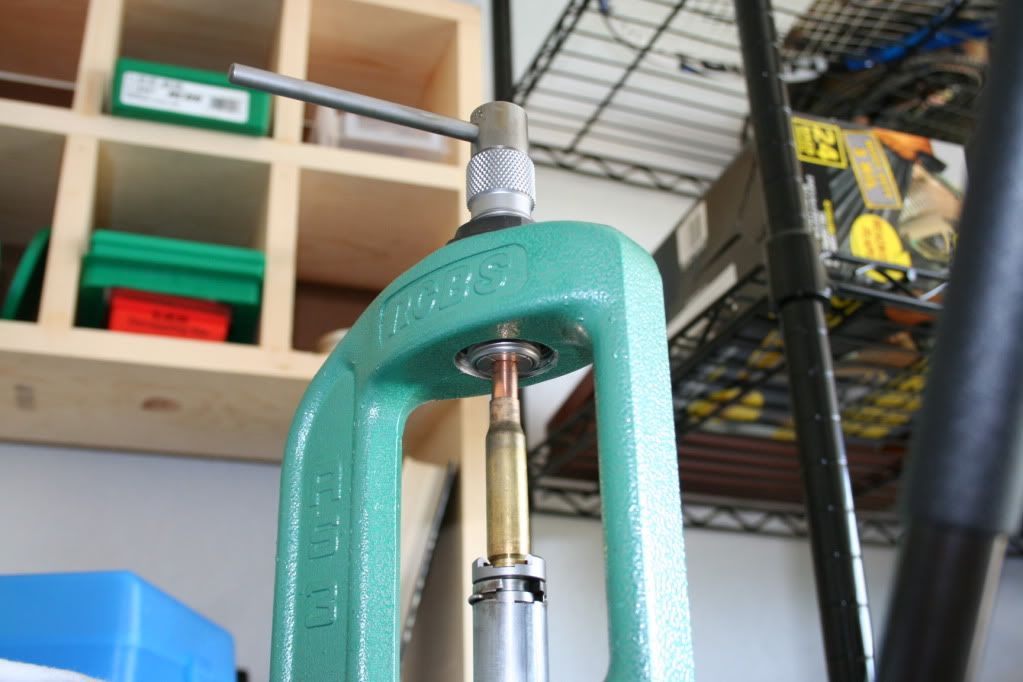 Took a few extra seconds to adjust the tension but then it came right out. Step 14 Finish setting up seating die I used the sierra book and went with the suggested 2.75, the hollow point round I am using isn't perfectly uniform but the max length was something like 2.753 so I felt I should be good to go. Just to be sure I chambered it in my rifle and didn't notice any additional tension so I went with it. They make a number of gauges you can buy. Or you can start long where you can't close your bolt then start working down so you end up 0.020 or so off the lands. Safer to probably start from the factory specs and work your way up as your develop your specific load.
|
|
|
|
Re: A Beginner's Guide To Reloading
[Re: scot]
#3142606
04/06/12 11:55 PM
|
Joined: Jan 2008
Posts: 9,367
scot
OP
THF Trophy Hunter
|
|
OP
THF Trophy Hunter
Joined: Jan 2008
Posts: 9,367 |
Step 15 Time to Prime By the time you have your seater perfect your brass should be clean. This was annoying but you have to go through and pop the media out of the flash hole, compress out, and wipe down each round again. I foresee only doing one tumble in the future... Priming options are vast. Seems like the hand primers are the preferred method with RCBS edging out the lee but I have used neither so I am stuck with what came with the kit. 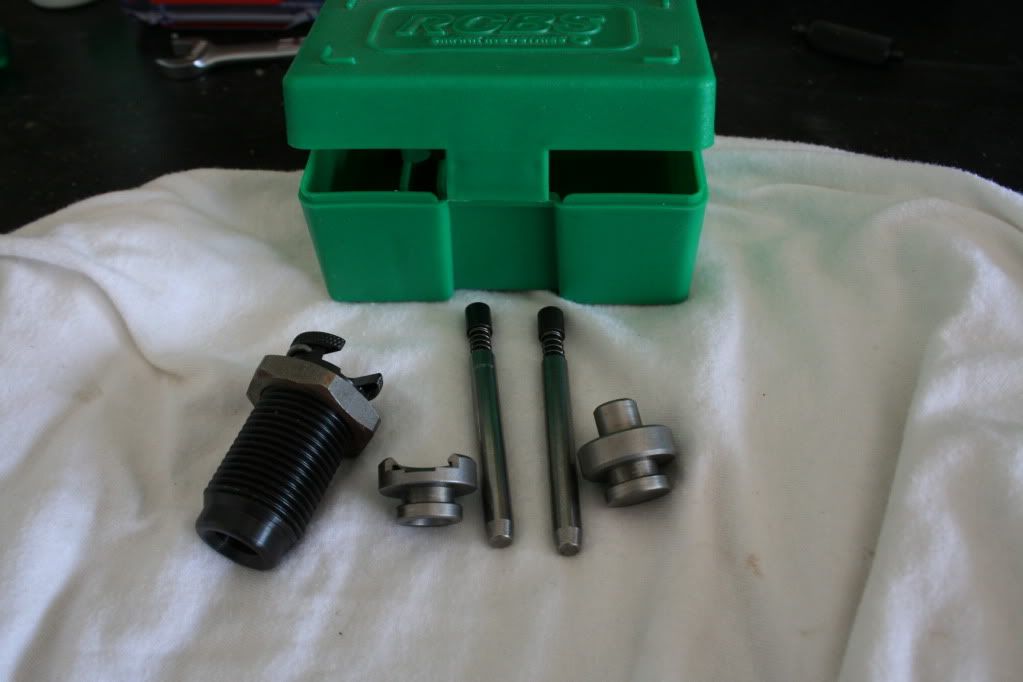 This is the RCBS Ram Prime Kit. Comes with a shell supporter that goes where your dies typically go. Two rods small and large and an attachment for the press ram for the rod. 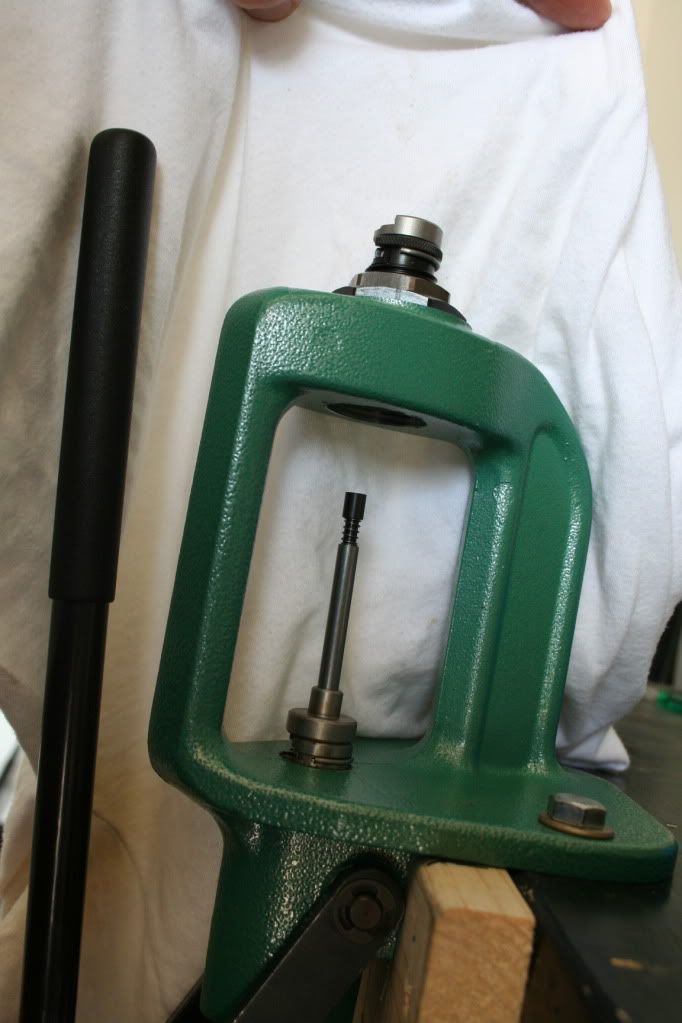 One thing I wasn't as crazy about was your can smash your primer to the point it will ignite with this kit. I did not do it but I did have to that I seated too deep so i realized I needed to adjust the shell holder portion so it would seat right as the press cammed over. Also the ram prime unit doesn't have a lock ring so I'll have to readjust the next time I prime. I feel like I will be borrowing a different priming method in the future. 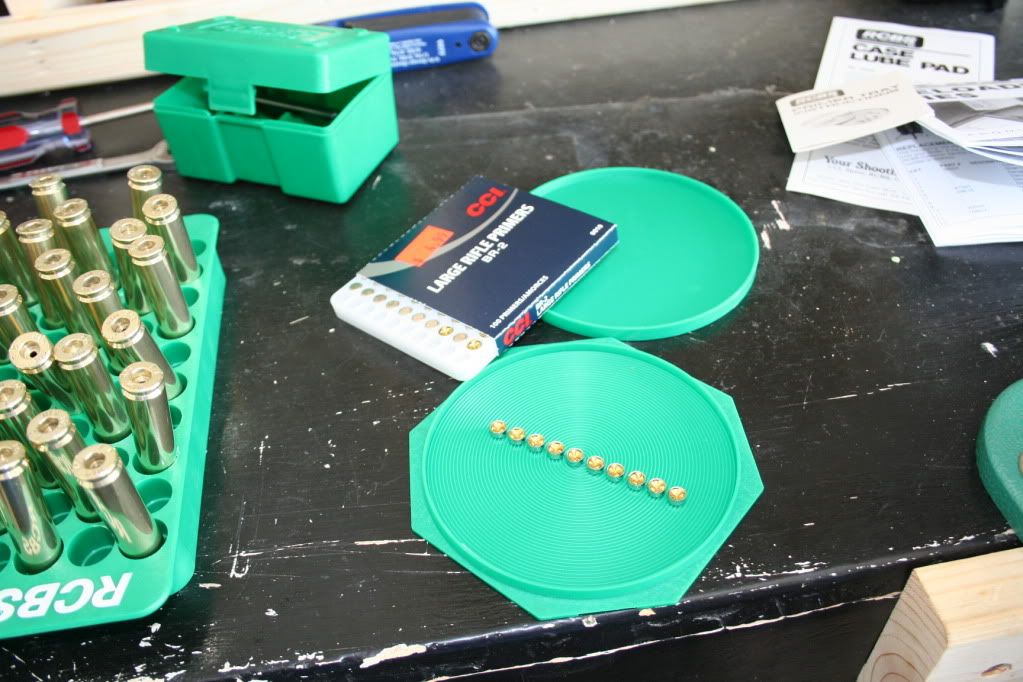 The primer tray isn't real needed for this priming option but does give you a controlled location to work. You have to hand load this device primer by primer so its important to work with clean hands. 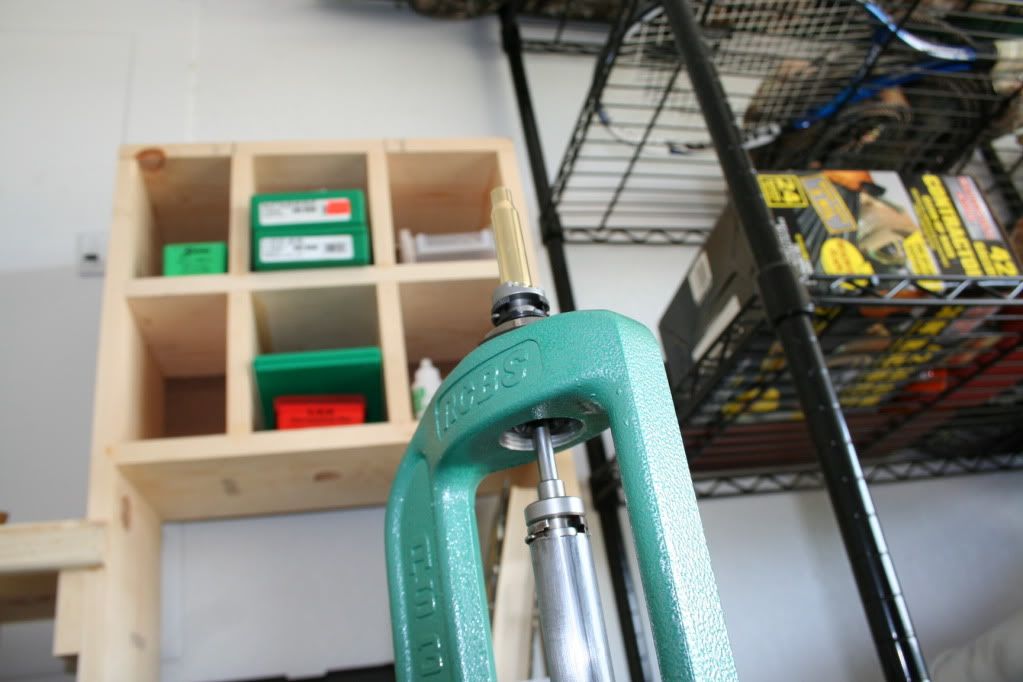 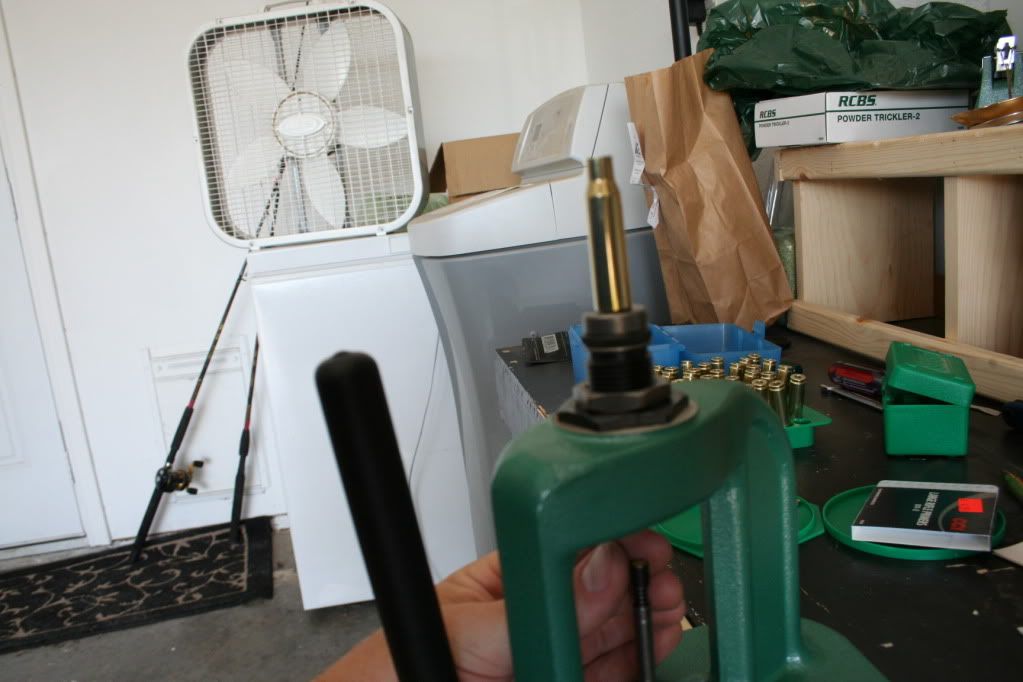 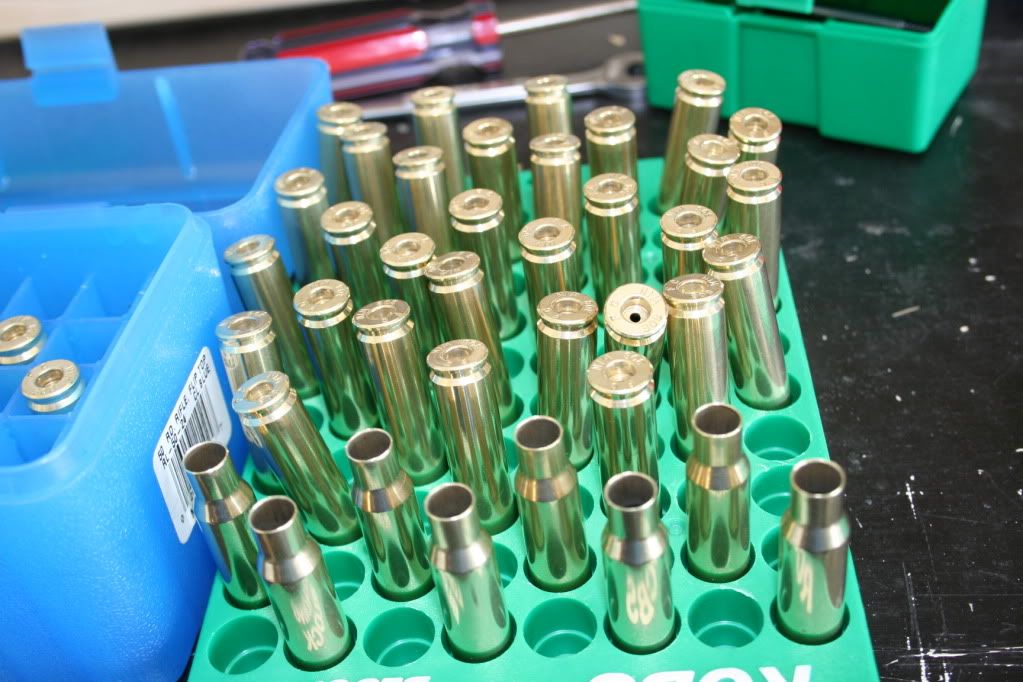 Viewed flash holes once again before priming then flipped to be sure I knew which ones I had and had not done.
|
|
|
|
Re: A Beginner's Guide To Reloading
[Re: scot]
#3142632
04/07/12 12:14 AM
|
Joined: Jan 2008
Posts: 9,367
scot
OP
THF Trophy Hunter
|
|
OP
THF Trophy Hunter
Joined: Jan 2008
Posts: 9,367 |
Step 16 Scale Setup If you get this scale new you will have to attach the beam and adjust the support disk to be sure the scale is zeroed out. 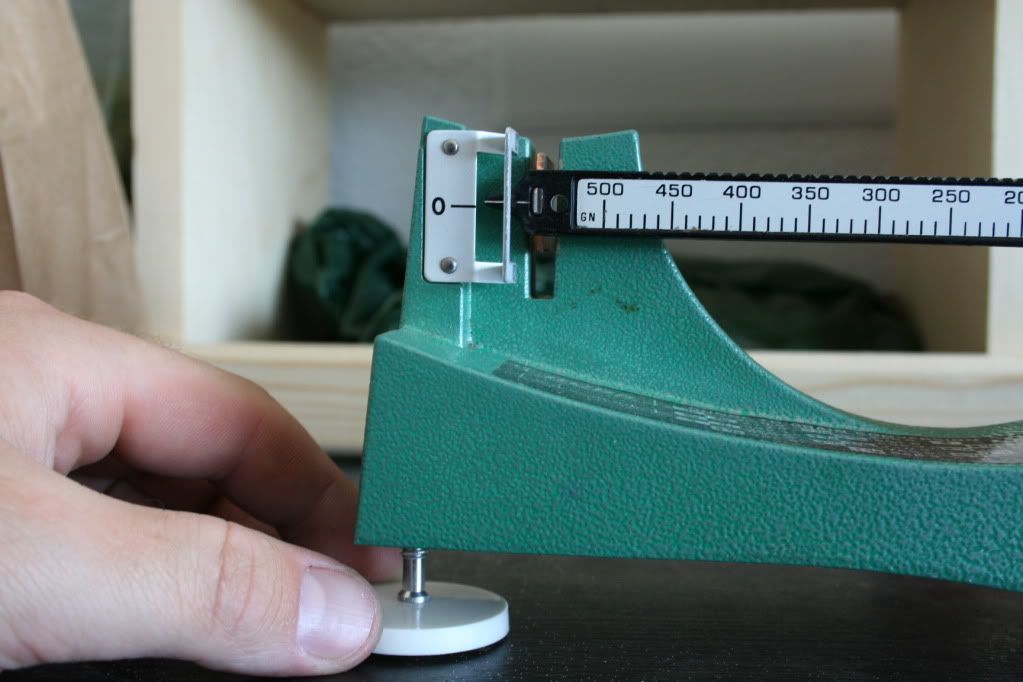 Step 17 Powder Measure Time/Seat Bullet I am going to demonstrate the most basic method but there are tons of nice gadgets to make this process much more enjoyable but this is the budget but accurate approach. I loaded based on the Optimal Charge Weight approach. The idea is load a number of different charges and choose the load that falls in between two or more loads with similar points of impact. This results in a much more forgiving load as there are so many variables that can change ever so slightly when reloading. I did lots or research in books and online and determined that I would start at 44gr and work up by .3gr up until 46.1 grains. Hopefully I would have a set of three loads that hit nearly the exact same place then I can choose the load in the middle and adjust seating depth to tighten groups. A set of measuring spoons works great. I used a 1/4 of a teaspoon and it appeared most of my loads were right in the 1/2 teaspoon range. 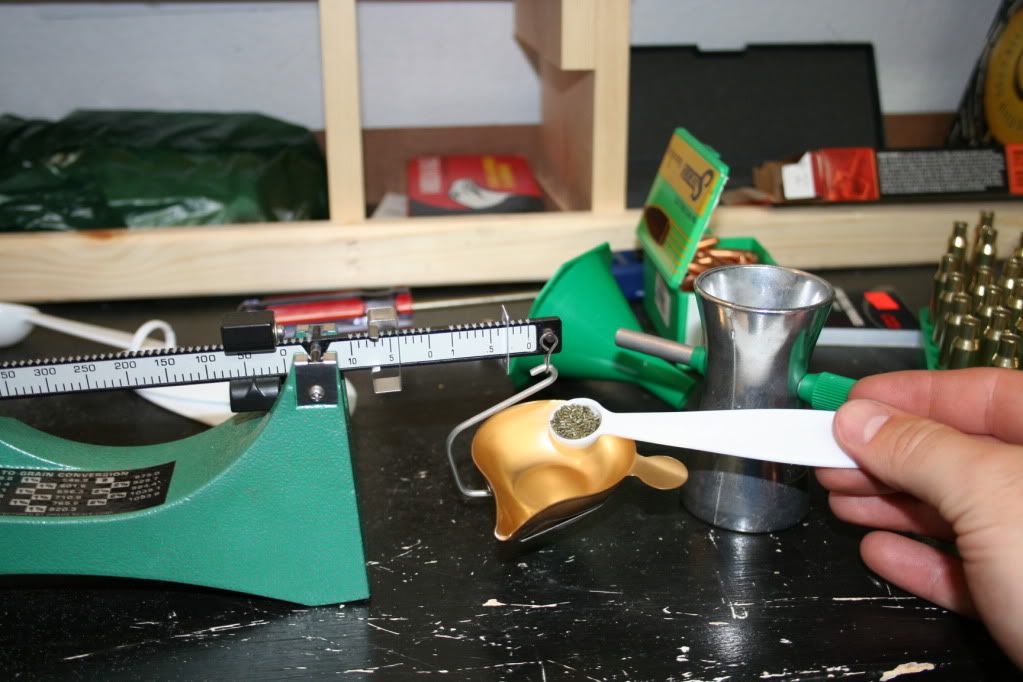 Once you get the scale to come off of the base slightly, I switched to the trickler. You certainly can get away without one but I only went over 3 times in 24 rounds and I'm sure it would be quite a bit more work without one. 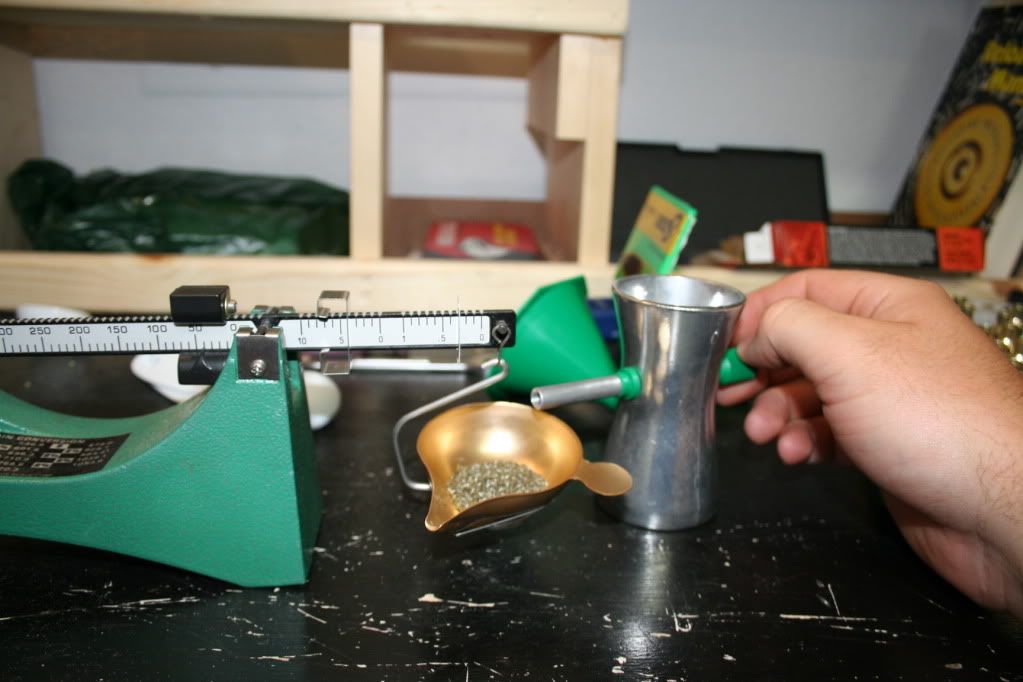 Small warning about the trickler though, its wise to gently move the trickler spout away from the scale when your remove the scale plate. As you bump around it will drop powder and if it is over the scale you will begin to change your load amounts so its easy enough to slightly move the spout and not worry about it. 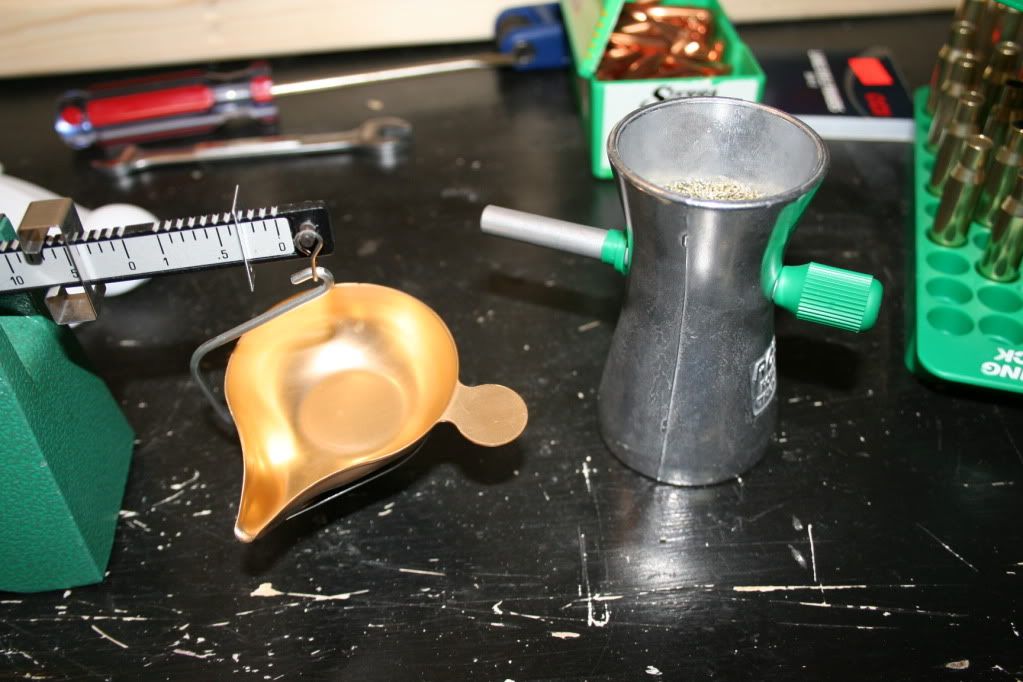 Once you have measured the powder poor into empty case. 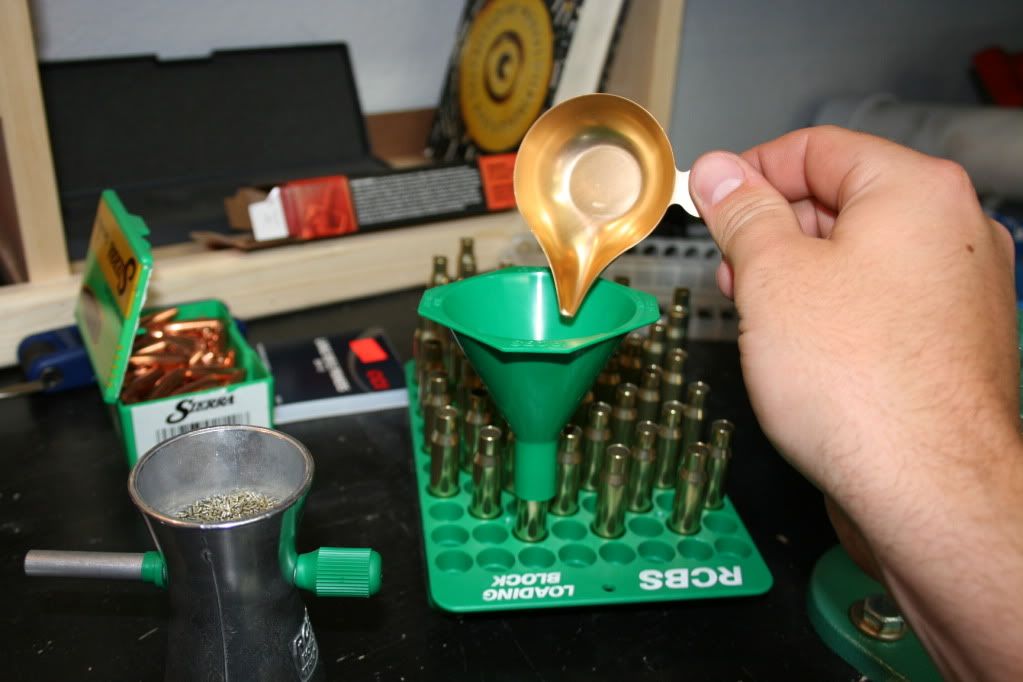 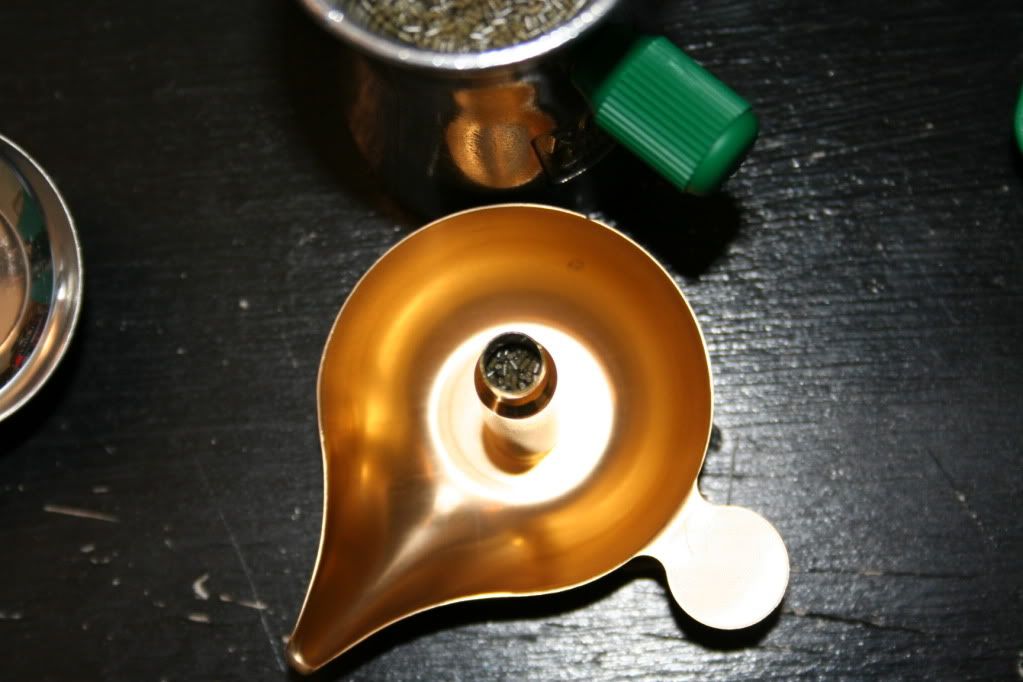 The load should take up most of the case capacity 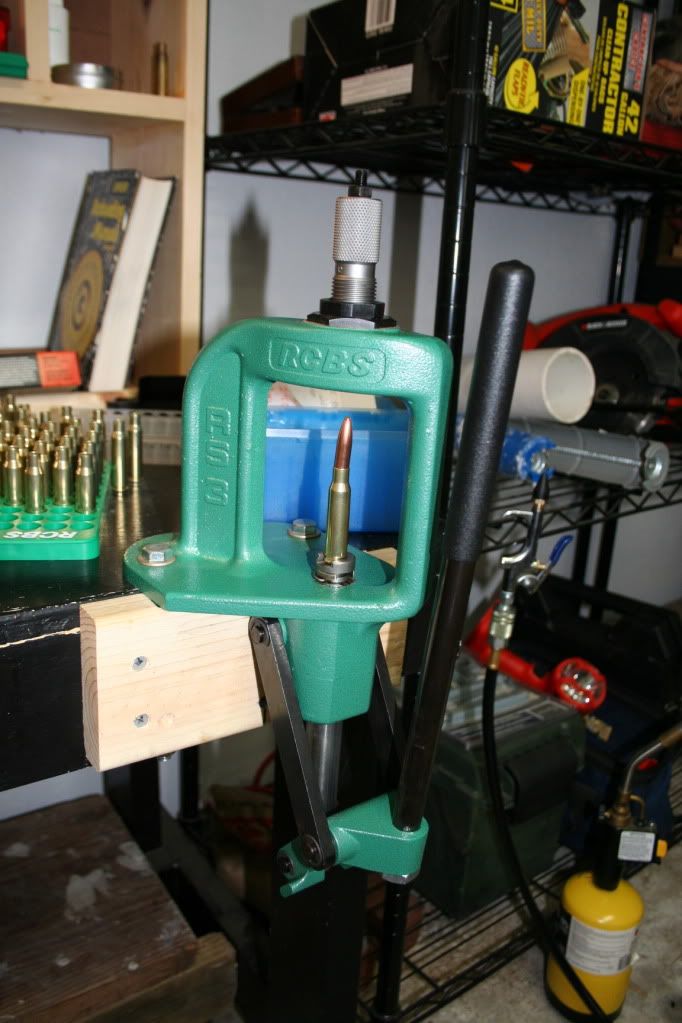 Because I was loading numerous charge weight I went ahead and loaded the round immediately after filling. I used the blue case to keep the different loads organized. I did try to keep the bullet a bit straighter before pressing, just wasn't able to do that while taking the picture. Step 18 Rest  3x 44, 44.3, 44.6, 44.9, 45.2, 45.5, 45.8, 46.1 Over the course of two evenings and a couple hours this afternoon I loaded 24 rounds and have 26 pieces of primmed prepped brass ready for load adjustment. I wish I could say it was only 6 hours total but it was probably more. I'm sure as I get more used to the equipment and get the bugs knocked out I can speed up the process a bit. I will report back after running these loads through my rifle.
|
|
|
|
Re: A Beginner's Guide To Reloading
[Re: scot]
#3142645
04/07/12 12:25 AM
|
Joined: Jul 2007
Posts: 23,638
Payne
Cat Herder
|
|
Cat Herder
Joined: Jul 2007
Posts: 23,638 |
Excellent write up.
You want the hand primer, it's efficient and consistent.
|
|
|
|
Re: A Beginner's Guide To Reloading
[Re: Payne]
#3142763
04/07/12 01:42 AM
|
Joined: Nov 2004
Posts: 44,585
RKHarm24
sergeant
|
|
sergeant
Joined: Nov 2004
Posts: 44,585 |
Lee Priming tool is what I have used for 30+ years. Had 2, 1 set up for small primer and 1 set up for large...I wasn't cheap, I was lazy. Take them inside and prime while watching favorite shows.
|
|
|
|
Re: A Beginner's Guide To Reloading
[Re: RKHarm24]
#3143011
04/07/12 03:25 AM
|
Joined: Jan 2008
Posts: 1,832
Kawabuggy
Pro Tracker
|
|
Pro Tracker
Joined: Jan 2008
Posts: 1,832 |
Whoever told you that an inertia hammer will not work unless the case has powder is wrong. You can pull bullets out of an empty case without issue. In fact, it is LESS messy if it does not have powder in it. Also, let's see if I can save you some time and energy on those primer pockets.... Get you a primer pocket cleaner that can be mounted in a cordless drill. Use this to clean the primer pockets out, and keep them at exactly the correct depth. DO NOT TUMBLE until after you have completely finished the round. I know this will draw some criticism from some, but I don't tumble my loads until they are finished. Then they go straight from the tumbler into storage containers. Some people will post crazy things about the powder burn rate changing as a result of tumbling charged rounds. They will believe that because they heard it somewhere before, but in reality there is NO truth to it. Tumble your own loaded rounds, then fire them over a chrono and compare to non-tumbled rounds and let us know if you see a difference. You won't. The only difference will be that you won't be wasting time digging media out of primer flash holes. Have you looked into buying one of these yet: http://www.youtube.com/watch?v=JZGkWUtKz4kAfter that, you'll need one of these: http://www.youtube.com/watch?v=KwGrlzrVAC8I have both and I can tell you that reloading forever changed with the invention of these two devices. The process is much faster, I feel more accurate, and over-all the processing of the cases goes much quicker and hurts your hands less when you are processing hundreds (if not thousands) of cases in a single session. The Lee case length trimmer and guides are AWESOME, and yet still low tech. Look into them. Buy them for your caliber, then find a way to make them work on the RCBS case prep center and you will be loving life. If you can't swing the prep center now, find a way to make them work with a cordless drill. The advantage of using the prep center is that I can pick up a piece of brass and trim it to length, champher & deburr the case mouth (inside & out), & clean the primer pocket before putting it down and then picking up the next piece. It simplifies in that you are not handling each piece of brass multiple times during the processing. You've done a great job posting your results with the pics, now let's see some targets that have been "killed" by your rounds.
A hog is nothing more than a bullet receptacle.
|
|
|
Moderated by bigbob_ftw, CCBIRDDOGMAN, Chickenman, Derek, DeRico, Duck_Hunter, hetman, jeh7mmmag, JustWingem, kmon11, kry226, kwrhuntinglab, Payne, pertnear, rifleman, sig226fan (Rguns.com), Superduty, TreeBass, txcornhusker
|

![[Linked Image]](https://i.imgur.com/0x2NHWJ.gif)

![[Linked Image]](https://krdesignsco.com/wp-content/uploads/2024/03/thf2-e1712949002371.png)